(redirected from Users.SettingsPages)
Let’s have a look at all inserts on the page Administration > Settings:
Let’s have a look at Administration > Settings section and all of its subsections.

In this section you can learn which functions are in “Settings” insert and how you can work with them.

In Company line the name of your company is written.


In this section you need to choose your country/countries in which you are working. For adding country it is necessary to start entering country name in this field and choose one from offered variants. If You would like to delete selected country it is enough to click cross near country name. Choice of country can influence on SMS sending and on call initiation from the system, you can read more details at "Order page" section. Choice of country can also influence on hints in address, if integration with Geohelper is switched on (it is switched on by default) and possibility to choose a country for delivery when new delivery types are edited or added.
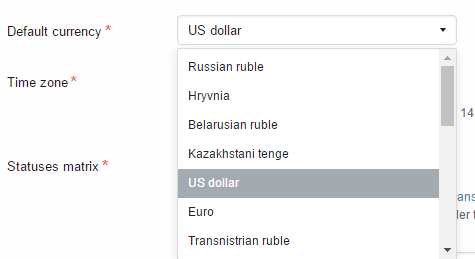
System is capable to choose currency in which the goods in your shop are sold. You can get the information on currency setting in Currencies article.
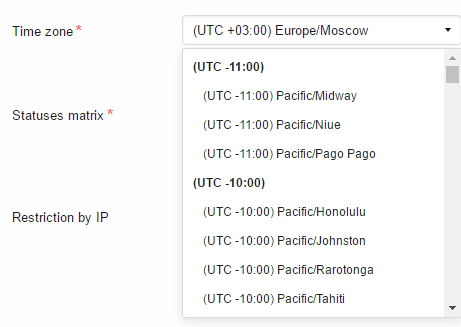
If the time zone of the city, in which your e-shop is working, is different from Moscow one, you need to set the same time zone, in order to avoid errors by data exchange between the systems.
System got solved the problem of access rights differentiation for user groups when changing status in certain order types. You can get information about it in the article Matrix setting.
“Working time” setting is used in "Status duration" and "Processing expiration" widgets in Analytics.
In each row the days of week and working time should be specified. Days, that are not specified in any row, are considered as days off.
“Non-working dates” setting is also used in “Status duration” and “Processing expiration” widgets in Analytics.
It is possible to specify exact date (12/06) or range of dates (01/01-10/01) in each row.
You can remove several non-working dates at once, selecting them by one click and clicking the bin icon on the right.
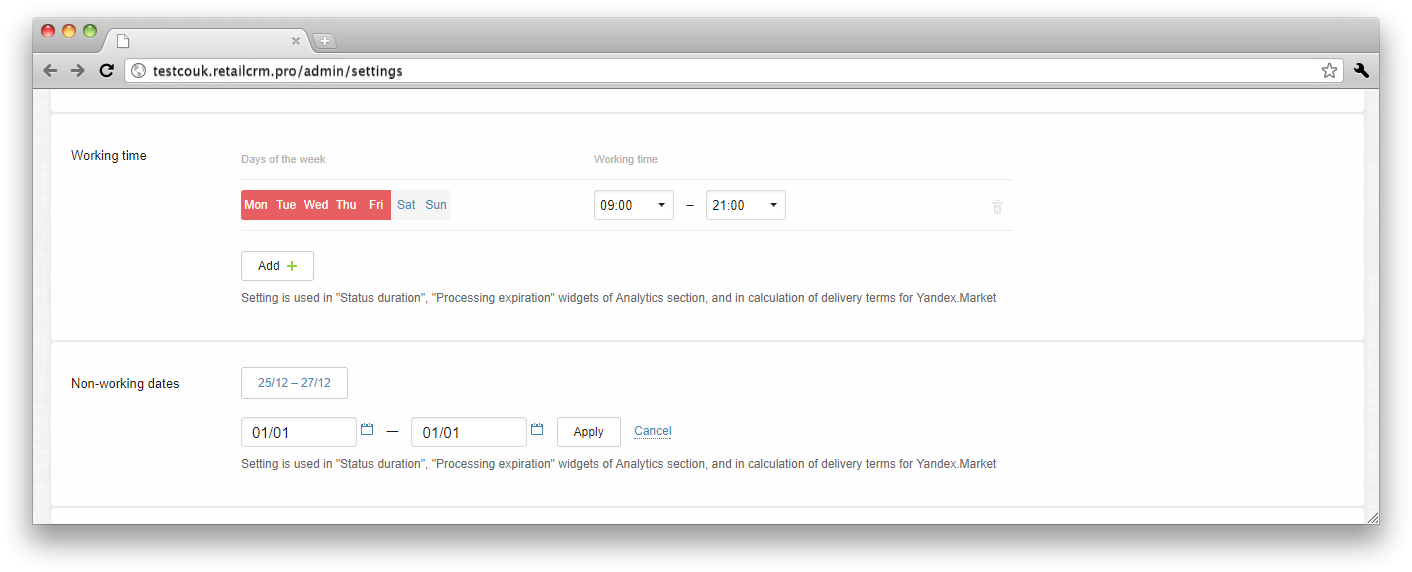
“Working time” and “Non-working dates” settings can be used in triggers with the help of is_working_time() function. For example, you can set the trigger, running only in working time.
Important: when building of “Status duration” and “Processing expiration” widgets and also when calculation of exceeding of time limits for order statuses, non-working time is not considered.
An important access setting - restriction of access to system by computer network IP address. You specify the IP addresses from which the work in your system will be performed. And you will not be able to enter the system from devices of other network and get confidential information, even if you have the passwords.

If you do not specify anything the system will be accessible from any device.
The capability was developed to use visual editor for making changes to email ready templates.
There are 2 variants offered in settings: to use and not to use.

To use visual editor
A ready text, that can be edited, will be displayed in the email template. Everything that is placed in bracers {{ }} or {}, needs programming.

The same situation is with the letter template, that is sent from the customer or order page. It is possible to change the template text itself, change its font, insert links or images. It is convenient, for example, when you need to send a letter with standart contents (a standart template is used for that, for example, about the fact, that “your order was accepted”) and there is a necessity to add any personal for the customer comment. In order not to create one more template and not to write the whole letter again, it is convenient to insert corrections or necessary additions to the ready template.

Do not use visual editor
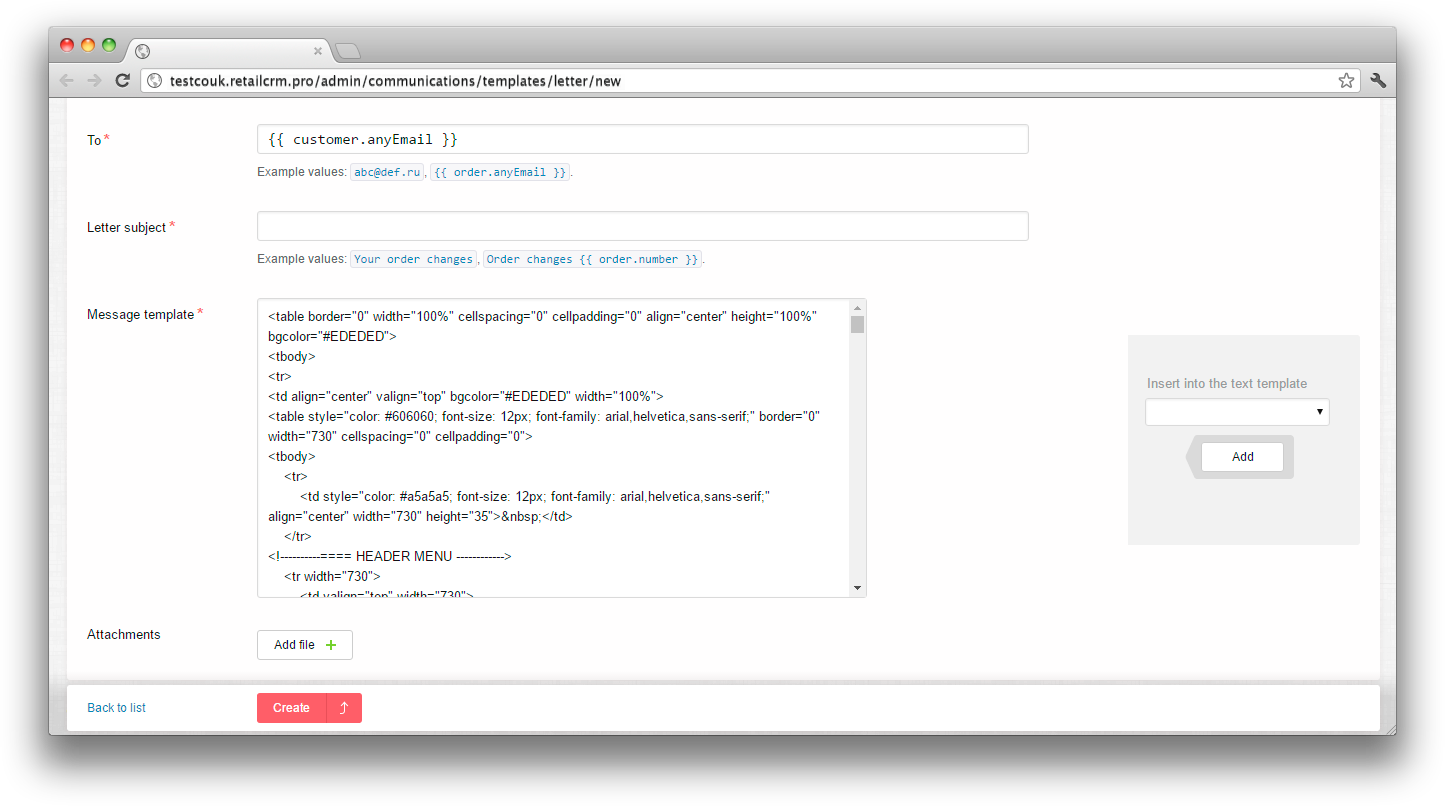
If you choose “Do not use visual editor” on the Settings page, then when writing a letter from order or customer page, and also when editing a letter template, the content of the letter is displayed in the mode of source HTML code:
This setting allows to specify integer or fractional quantity of items in the order or in leftover stocks.

This subsection describes the functions present in the “Orders” insert on the “Settings” page and the way you can work with them.
System contains and every day gets orders from different shops and also the system itself generates order numbers. The first field allows to change the template for orders numbers generation, that are created inside the system.

{id} - is an order identificator, created in system. On the ID basis, the order number is formed according to the given template. If you need to highlight such orders, in order for the numbers to be different from others, you can add a letter/word to the beginning or to the end. For example like СRM{id} or like {id}С.
The second field “The template of order number generation from API” offers you to make a template for order numbers that come through the API, i.e. from your e-shop.
You can use external code {external_id} for the API order number template.
This way for orders coming through API you can:
{external_id} template
{id} template. This case is the pass-through numeration for all shops in system
You can add prefixes/postfixes additionally.
What order number will the system assign if the order comes from an e-shop?
For the order that comes from any e-shop system assigns the number that is assigned in the shop itself.
In case if your several different shops have the same order numbers, system will receive 2 orders with the same number. There won’t be any conflict in system, as “Shop” field values will be different.
How to avoid the situation, when different shops send orders with the same numbers
In order to make order numbers unique for every shop, you need to specify order number generation templates on the shop side as well.
For example, 1C Bitrix system starting from version 12.5 is capable to create a template, according to which orders will be numerated. In the left panel of 1C-Bitrix administrative interface you need to go to Settings > Modules settings > E-shop. Then you need to find the field “Order number generation template” at the bottom of the “service settings” block.

“Notifications of changed orders” setting is used when you need to turn on or off sending the notifications of order change for managers who are responsible for orders.

Important! Automatic allocation of orders works only for orders not older than 3 months.
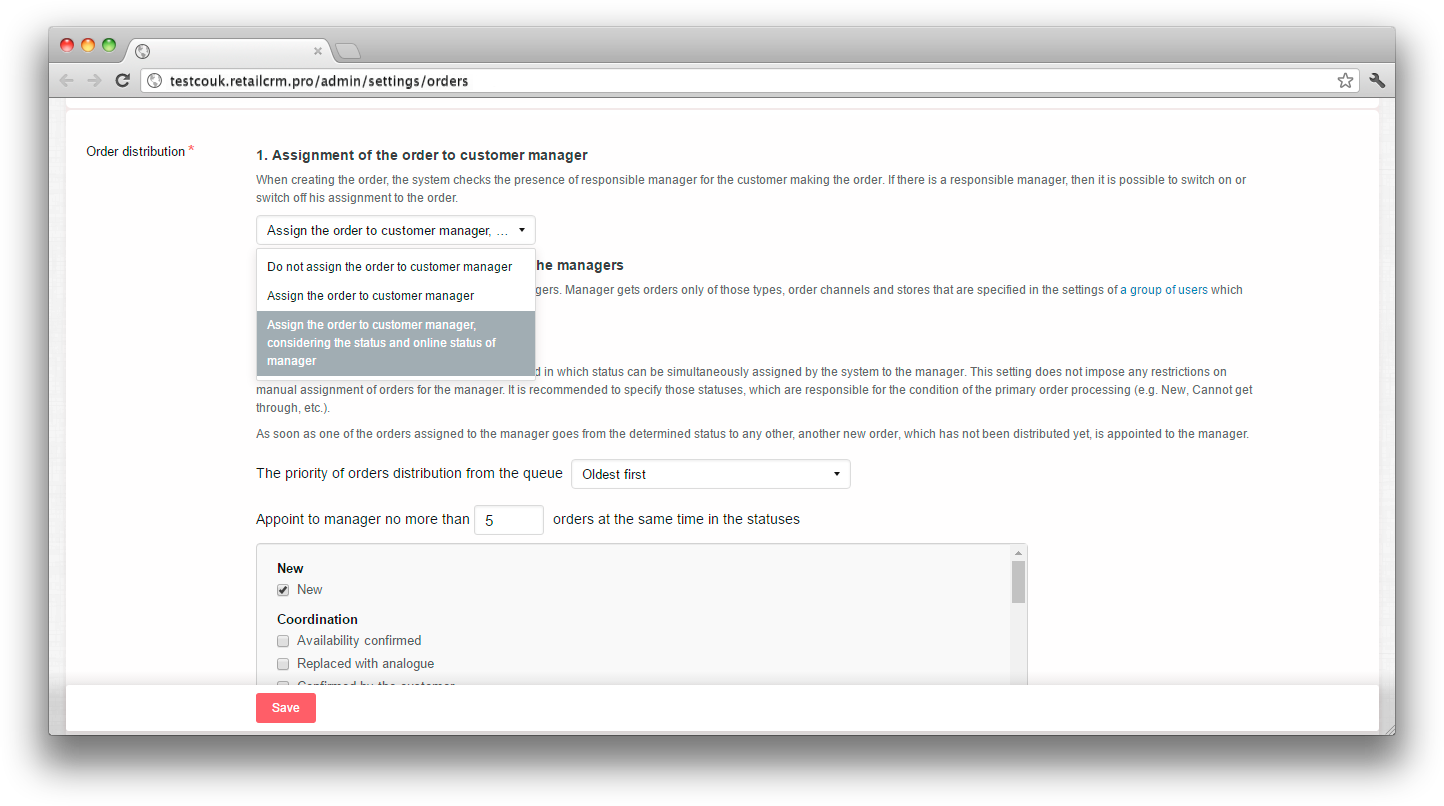
You can adjust order allocation among managers in system. To turn it on go to section Administration > Settings > Orders.
When order appears, the system checks the presence of the manager responsible for the customer, who made the order. If the responsible manager is present, this setting can be used to turn on or off his assignment to the order.
«Do not assign order to customer manager» mode
The system will not automatically assign the order to the manager, who is attached to customer, who made the order.
«Assign order to customer manager» mode
The system will automatically assign the order to the manager, who is attached to customer, who made the order.
«Assign order to customer manager, considering the status and online status of manager» mode
System will automatically assign the order to the manager, who is attached to customer, who made the order. At that the system will take into account manager status. If the manager is not online, the assignment will not be made.
You can choose between two options in this setting:
«Do not make» mode
In this mode the system performs only automatic order assignment to the manager, who is attached to the customer, who made the order. At that the setting «Check customer manager status when assigning to order» is considered. If the setting is turned off and the customer has the responsible manager, then he is assigned responsible to the manager (otherwise allocation is not performed). If the setting is turned on, then the customer manager is assgned responsible for the order only in case if he is online and in “Free” status. You can read more about manager status in system in Global user status article.
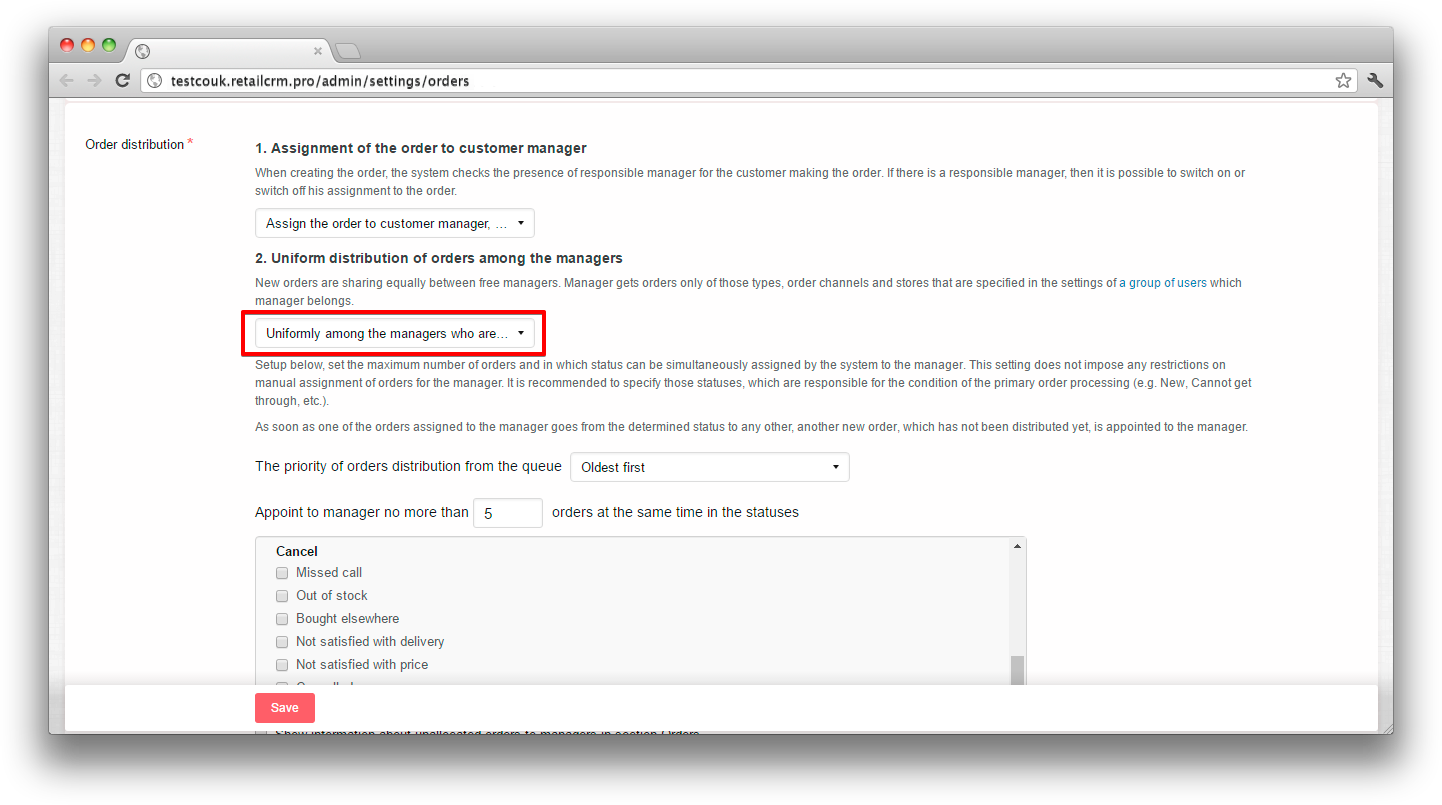
«Uniformly among free managers in the view of order type, way of registration and the shop» mode
In this mode, same as in the “Do not make” mode, firstly, the manager responsible for the customer is checked and, if it’s possible, assigned responsible for the order. If it is not possible, then the mechanism of allocation among free managers is launched.
When allocating the order, the system tracks the order type, way of registration and the shop from which the order came. For allocation the managers are considered from those user groups, in which the type, way of registration and the shop (are set up on the user group page) are the same as in the order. More than that, the manager status is considered: he should be logged in the system and be in “Free” status (see Global user status).
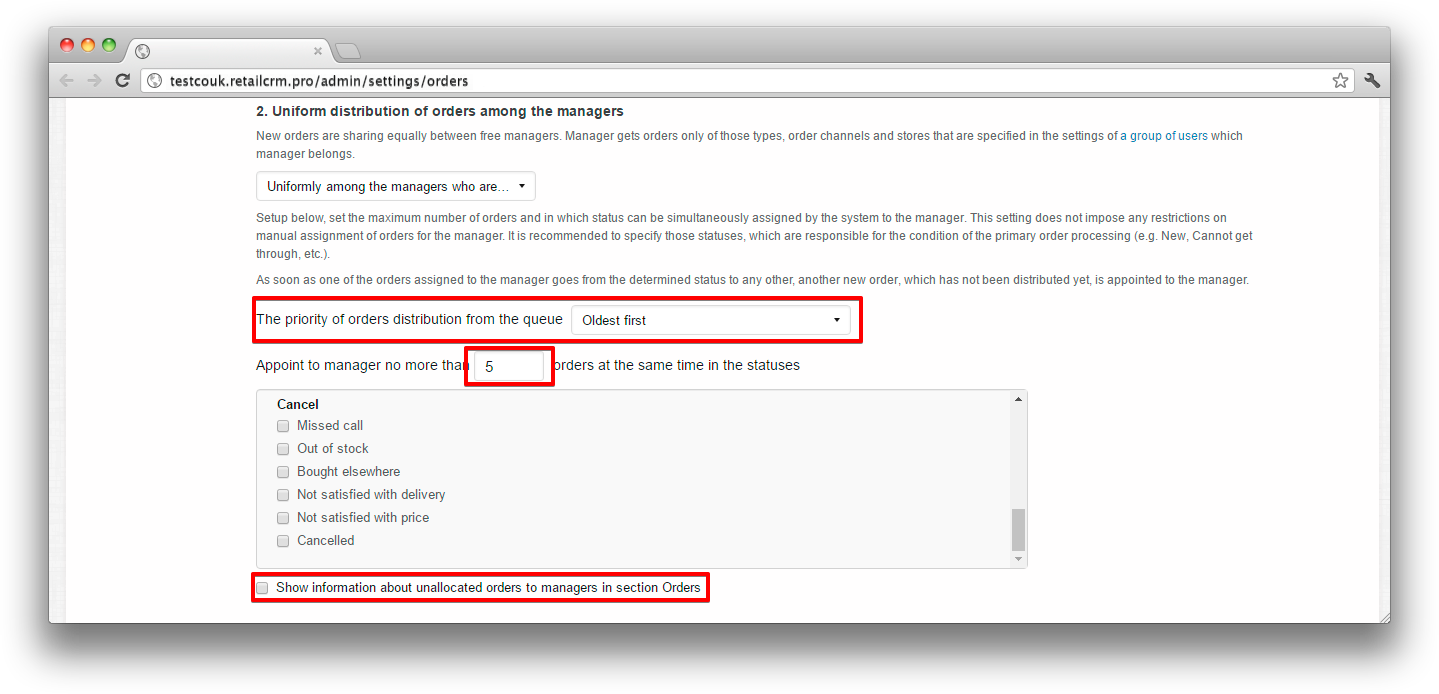
Furhter you can set up the order allocation priority: old orders first or new orders first.
For example if to set up allocation of old orders first, this would mean that managers will be allocated orders starting from the most early ones.
If to set up allocation of new orders first, then, accordingly, the manager will be assigned the last, most «recent» orders. In such a way, having a big queue of orders, you can work first with the «hottest» customers and only after that deal with old orders.
It is posible to setup in settings the number of orders the manager can work with, as long as they are in the specified statuses ( for example, in “New” status).
If manager is in the system, in «Free» status, and limit of orders assigned to one manager is not exceeded, then new not yet distributed order will be added to him. When creating the order, task for allocating orders among managers is initialized.
When forming of new order, the system chooses free manager, assign the order to him and move it into end of turn for allocation, so the next order will be assigned to another manager. Thus orders will be distributed uniformly among all managers depending on load.
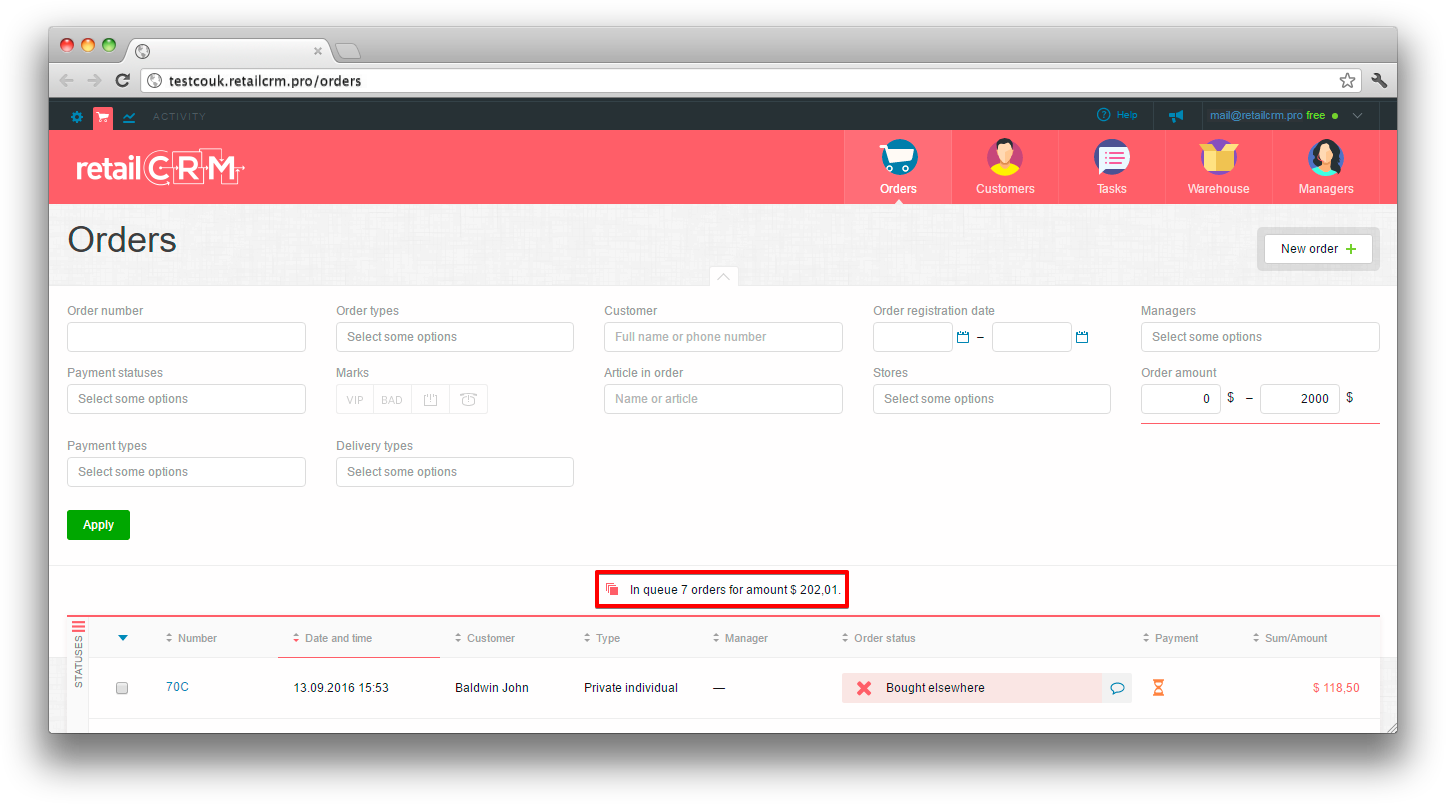
The next allocation setting is the check mark «Show information about unallocated orders to the managers in Orders section». This option allows to see the number of unallocated orders and their sum on the “Orders” page, that can be as information for the company director, as well as motivation for managers.
Let’s give examples when the function of automatic order allocation can be useful:
In order to avoid the situation when a single manager is assigned a very big amount of orders, and let the manager competently process them, it is convenient to set a definite amount of orders that manager can work with.
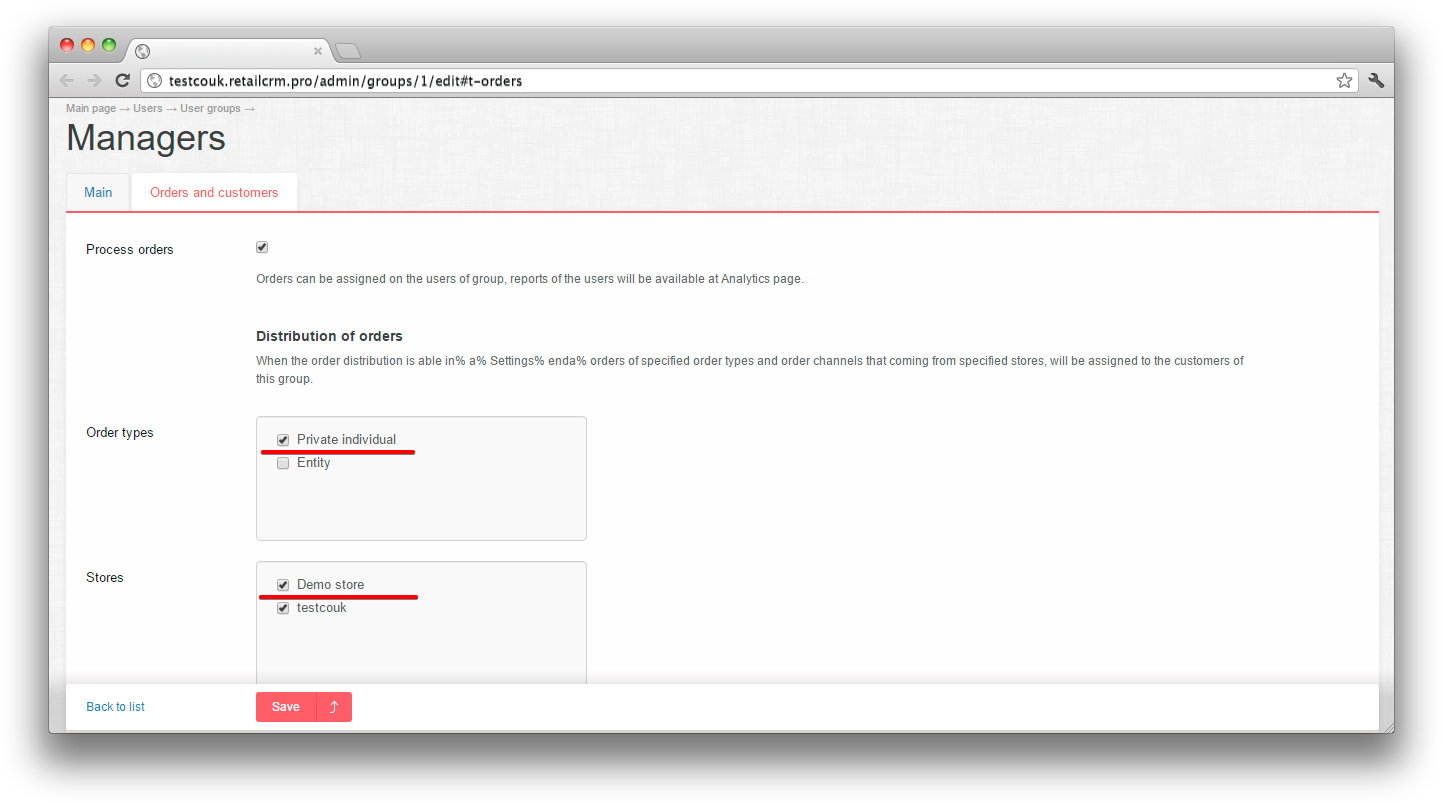
The order and the shop type are set up in section Administration > Settings > Users > Groups > Managers > Order allocation. The needed user group with the active column “Processing orders” is chosen.
Let’s have a look at the situation on the example of “Managers” group: the order type “Orders from the private individuals” and the shop “Demo-store” are chosen for this user group.
There is also possible to change manager manually inside the order, even if different settings were chosen.

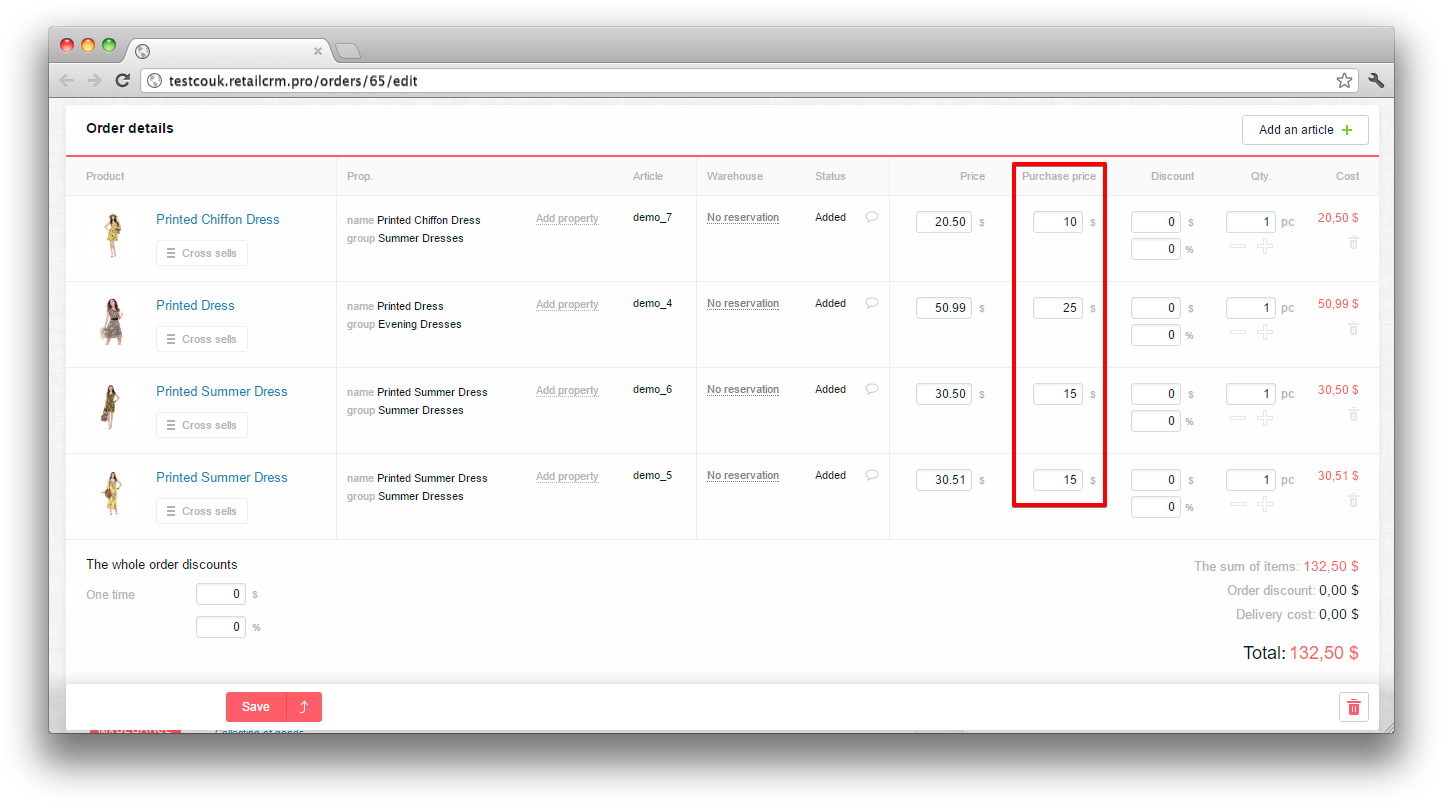
Purchase price setting is needed for displaying this price in the order card. If the purchase price is not loaded for items, then there is no sence to display this field.

If to display purchase price in the order card, it is possible to choose the mode: purchase price viewing or editing from the order card.
The purchase price field in the order card (in the edit mode) looks like this:
This setting allows to select the mode for the item price in the order. If you have an exact price on products in the catalogue, managers should not have a possibility of changing the price. If you have unique products or services, enable the edit mode for the price.
The option “Change price type for the order item when item quantity is changed” allows to enable/disable automatic expanding the price type which is the first in order and corresponds to the filter conditions. The setting is activated when the item quantity is changed within one commodity item.
The setting “Change price type for the order item, if the current type is not available” allows to change the price type of the item automatically if the order does not correspond to the filter conditions of the current price type. The setting is activated when the order is saved.


If to choose “Yes” value in the “Change price type for the order item, if the current type is not available” setting, then item price type will be changed when saving the order, if this order will not meet filter conditions of the current price type.

There is a “Delivery” block on the order page, where the address is shown as a necessary, if customer pickup is not chosen. The address may consist of different fields at the discretion of the shop, courier or different aspects. If the customer is filling the address in a single field, and you need to see separate fields “Street”, “House” and etc. in the system, you can choose option “Divide address”. You can also choose short or full address form as a default for new orders which are made from the system.
You can see examples and screenshots in Order page section.
This setting allows to adjust the order discount automatically in the case when it`s not possible to divide the discount between items.

If you activate rounding, it is applied to items in an order. That price, which is taken away from an item sum as a result of rounding, will increase to an item discount.
You can activate a function of rounding with the help of setting “Round the price of the item”.
Note: It's possible to round prices of those items, which you can edit in the system interface.
Additional settings will appear after activating as in screenshot:
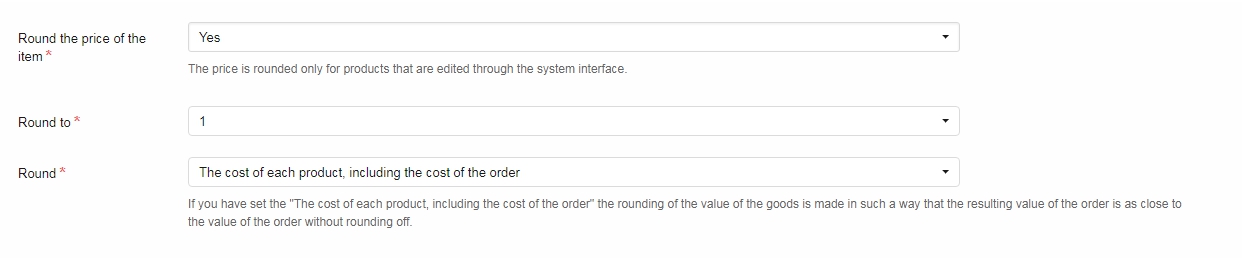
Round to - means that you choose a value next to rounding. For example, if an item costs 2,45 and you choose “round to 0,50”, the item price will be 2,50.
Round - there are two settings: “the cost of each product, including the cost of the order” and “the cost of each product separately”.
If you choose “the cost of each product, including the cost of the order” the total cost of the order will be closest to the cost before rounding of the items cost.
If you choose “the cost of each product separately” rounding of the items cost will be made irrespective of the order cost.
You can find more details on working with discounts and rounding in appropriate article.
E-shop customers value their time and it is important for them to know at what time the order will be delivered or they may want to specify their own time. Improve your shop service with the help of delivery time settings.
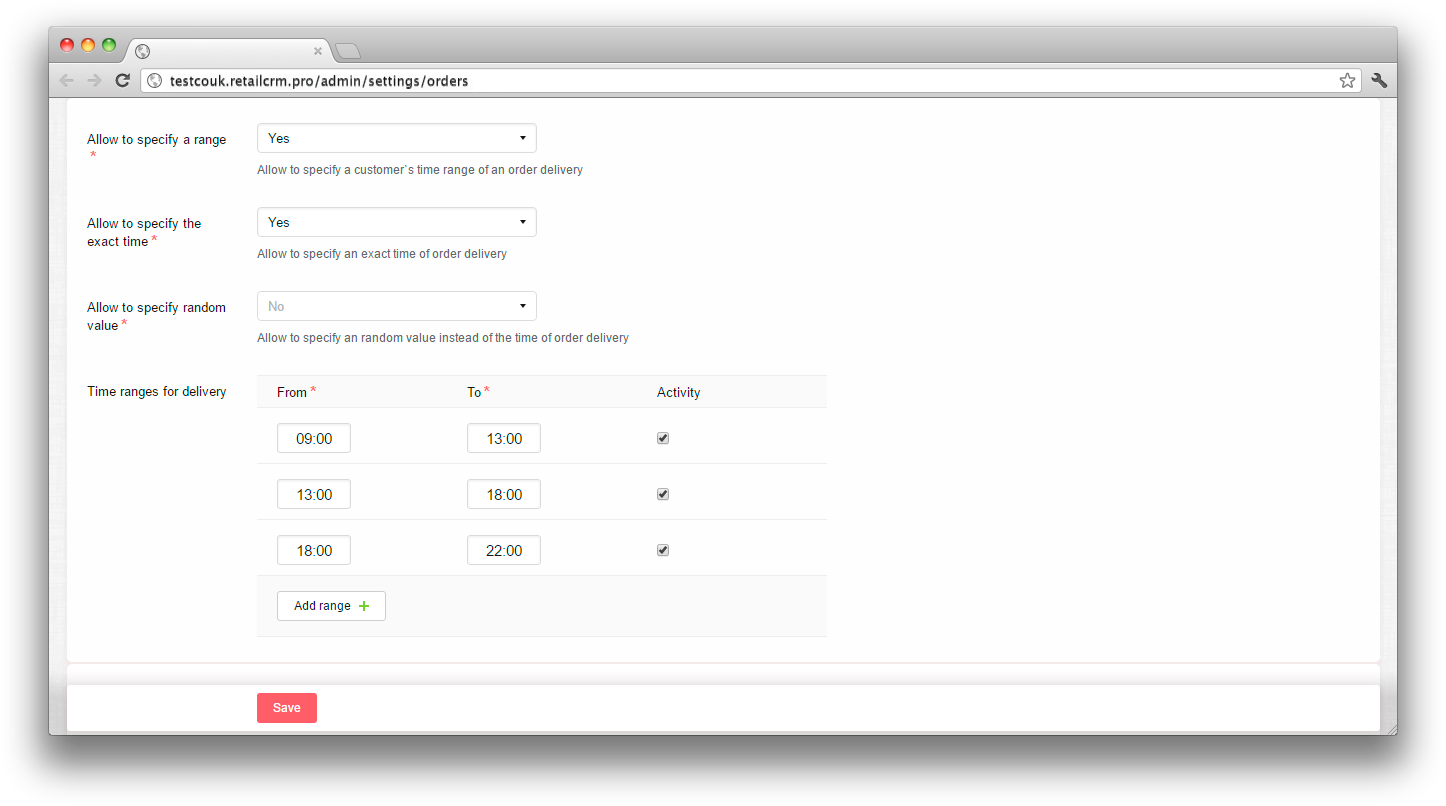
These settings allow to maximize the flexibility of delivery time management. What settings to choose depends on your company regulations.
You can allow to specify ranges which you set in the fields below or allow to specify the exact time. Or you can choose both as it is shown on the screenshot.
Add your own range and don’t forget to set the “Activity” tick, if you will use it.
The field “Allow to specify random value” means that you can allow or restrict the possibility of filling “Delivery time” field by an absolutely random value. It can be a verbal description, see the example on the screenshot below. In the order this option is called “Other”:
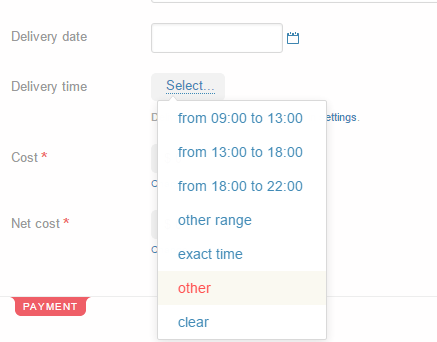
You can also see on this screenshot that in front of the field “Delivery time” you can choose the range, specify your own range or specify the exact time.
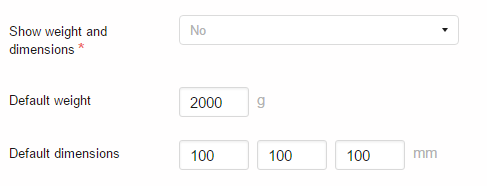
If you need to specify dimensions and weight in the order, choose value “Yes” in the option “Show dimensions and weight”. Below you can specify default values. The fields “Weight” and “Dimensions”(Length-Width-Height) will appear in the order.
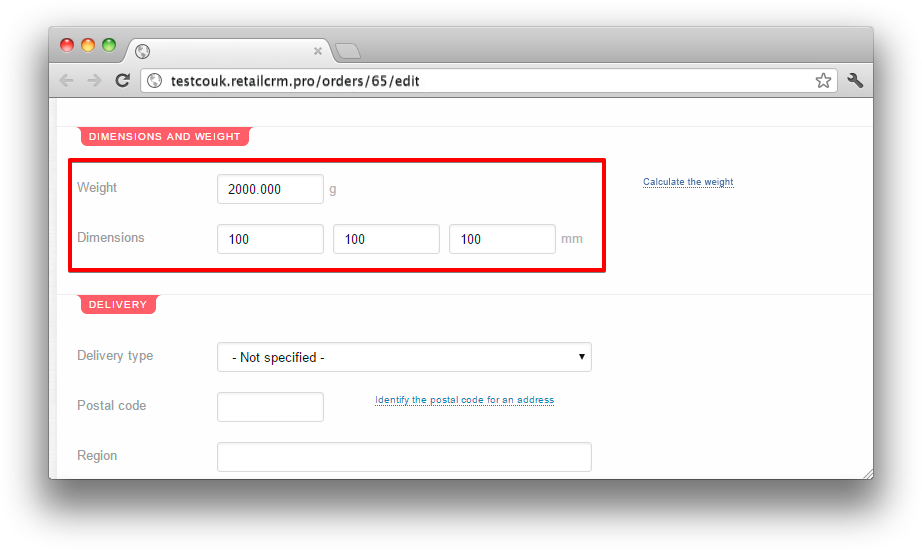
Information about order weight and measures is needed for many delivery services integrated with system. In case if the weight/dimensions displayment setting is turned off, but one of the integrational deliveries is chosen in the order (SDEK for example), then the block with these fields is displayed forcibly in the order card. At that the default values are set from the settings.
Below the dimensions and weight settings there are settings of additional fields displayment in the item collection window.
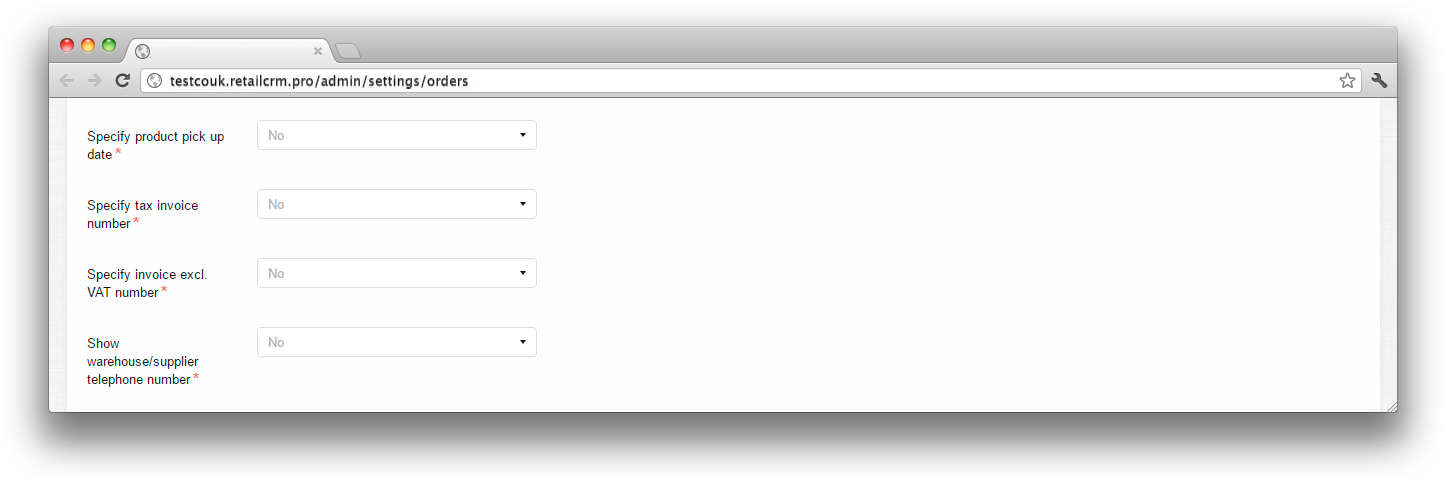
To activate necessary fields you need to choose “Yes” variant in the drop-down menu.
If all the fields are activated, then it looks like the following in the order itself:
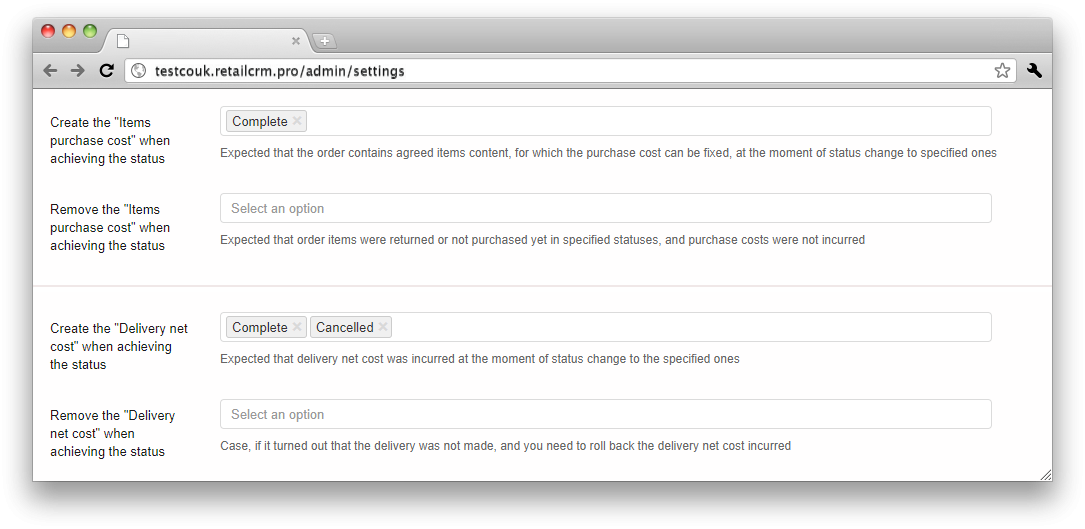
Сreate the expense of order cost when achieving the status - when transferring the order to the status chosen by you, the expense with the sum of purchase price on the order will be created automatically.
Delete the expense of order cost when achieving the status - when transferring the order to the status chosen by you, the expense with the sum of purchase price on the order will be deleted automatically.
Сreate the expense of delivery cost when achieving the status - when transferring the order to the status chosen by you, the expense with the cost of delivery will be created automatically.
Delete the expense of delivery cost when achieving the status - when transferring the order to the status chosen by you, the expense with the cost of delivery will be deleted automatically.
There is a capability to display customer fields in the order card in “Customer” block. Such fields are displayed in the view mode, i.e. they are edited only in customer card.
In order to display necessary for You fields, you need to go to section Settings > Orders. At the very bottom there is a line “Show customer fields in orders”. You can insert the names of the fields, which you need to display.
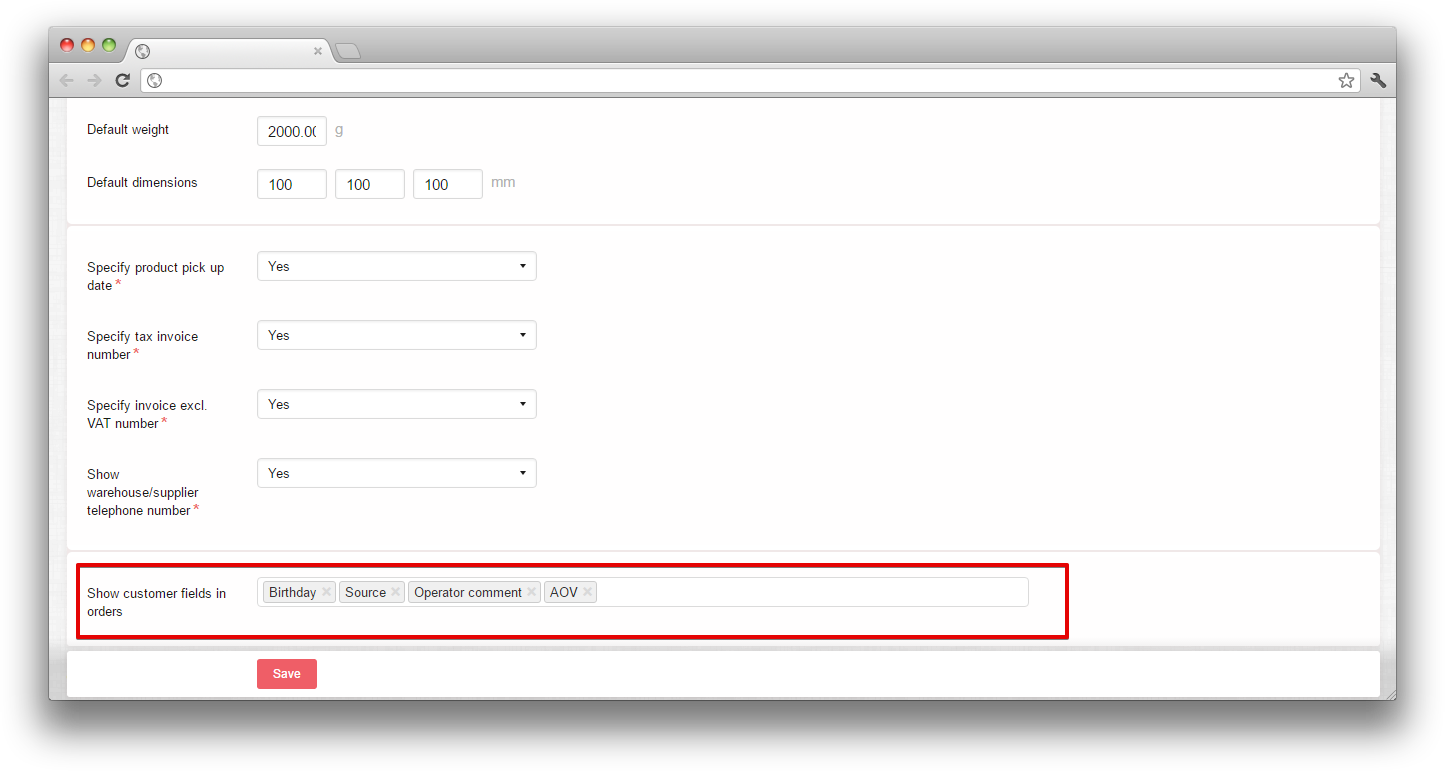
If customer card contains blank fields, they will not be displayed in the order card.
"Action for combinable order" setting defines what will happen with the order after its combining. It will be removed by default, but there is also possibility to transfer it to cancellation status.
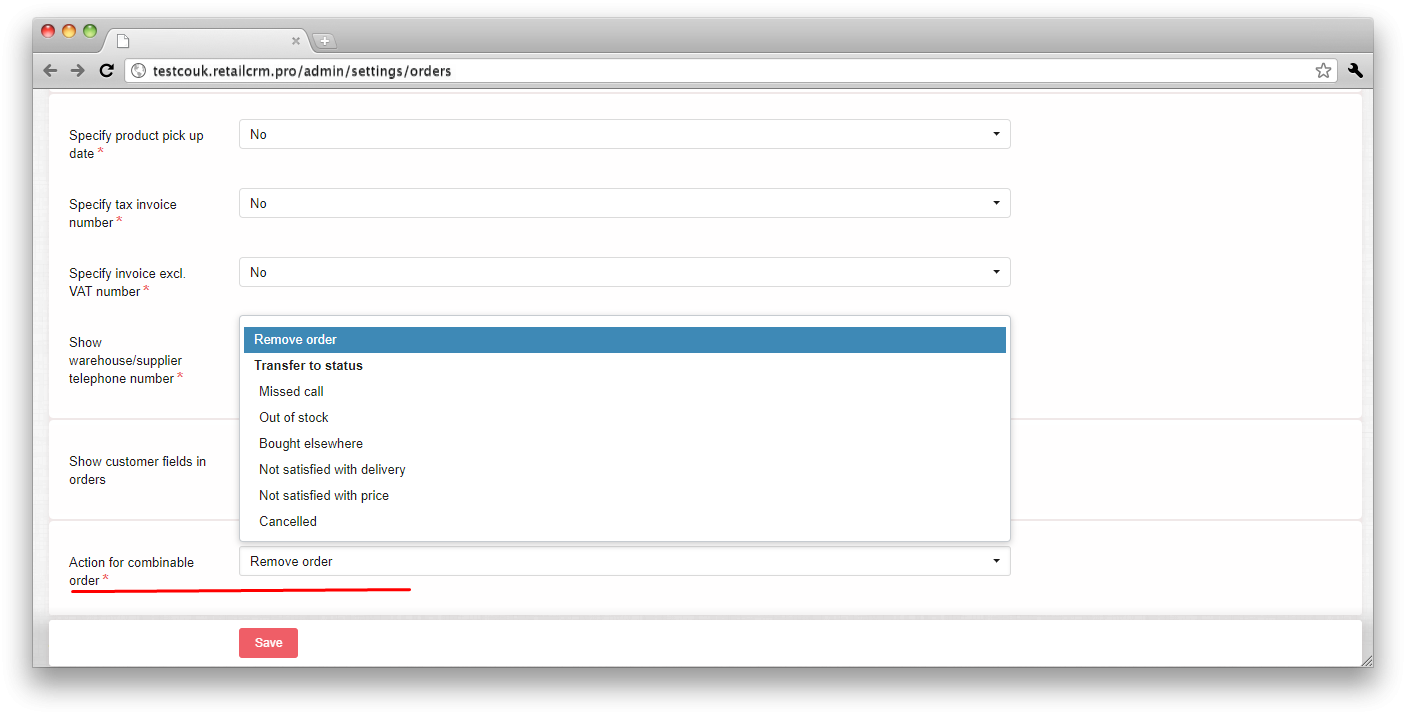
Note: statuses can be created at Administration > Statuses. You can find more information on statuses creation at "Order statuses and status groups".
The setting is important when exchanging data on orders with the integrated online store.
In case, if stores aren't connected with each other and have different order bases, then IDs are unique in each store. Therefore, when transferring order from one store to another one, you should reset external ID so that the order in the new store would be as a new one.
In case, if stores are connected with each other and have the common base, then it is not necessary to reset the external ID.
If you enable the setting “Common external identifiers of orders for all stores”, the external ID will not be reset, when changing the store.
With the setting disabled and the same external identifiers of orders in different stores, one can see a window with notification. The window notifies that the external ID will be reset, when changing the store.
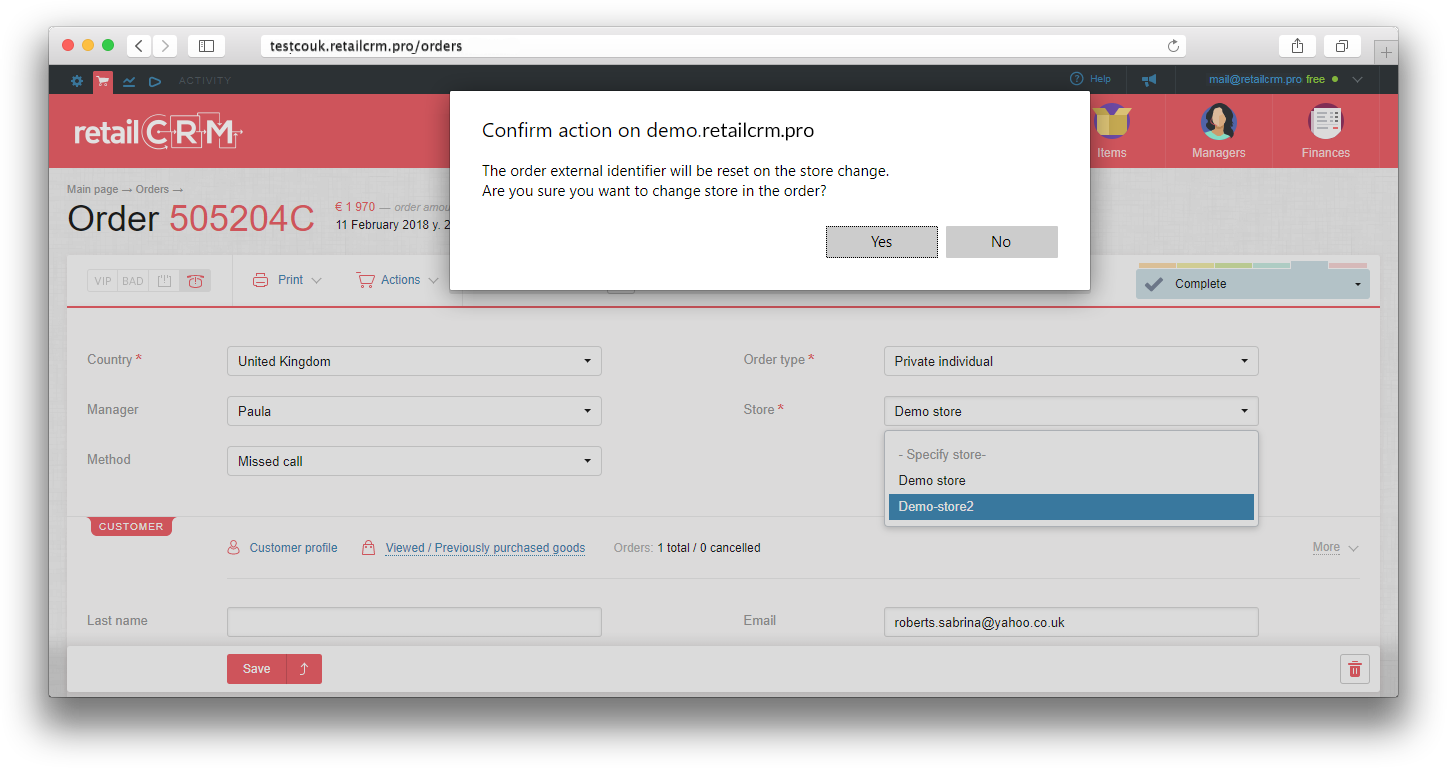
With the setting enabled and the already existing external identifier in the store, the order will not be saved. You will see the following notification: “The external ID of the order already exists in the store”.
In this subsection you can configure the automatic update of customer’s information from the order information. Customer’s card information will be updated if there is different information in order. You can set up the transfer of three types of information: Email, Phone number and Contractor data.
This subsection describes the options available in the “Items” tab on the “Settings” page and the way you can work with them.
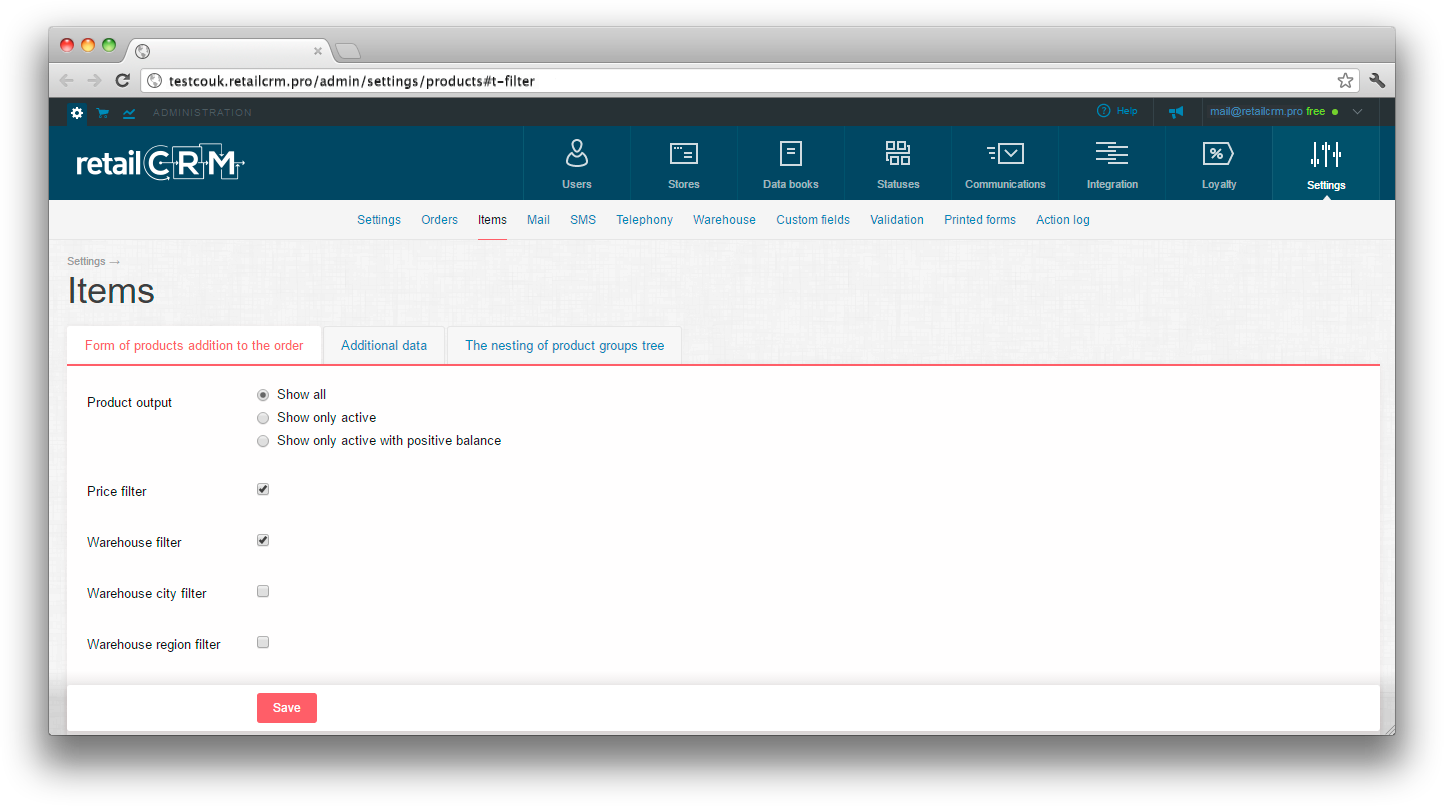
In this tab the parameters are set that are used when adding product to order.
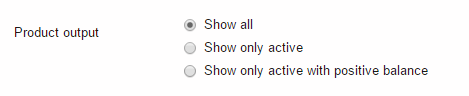
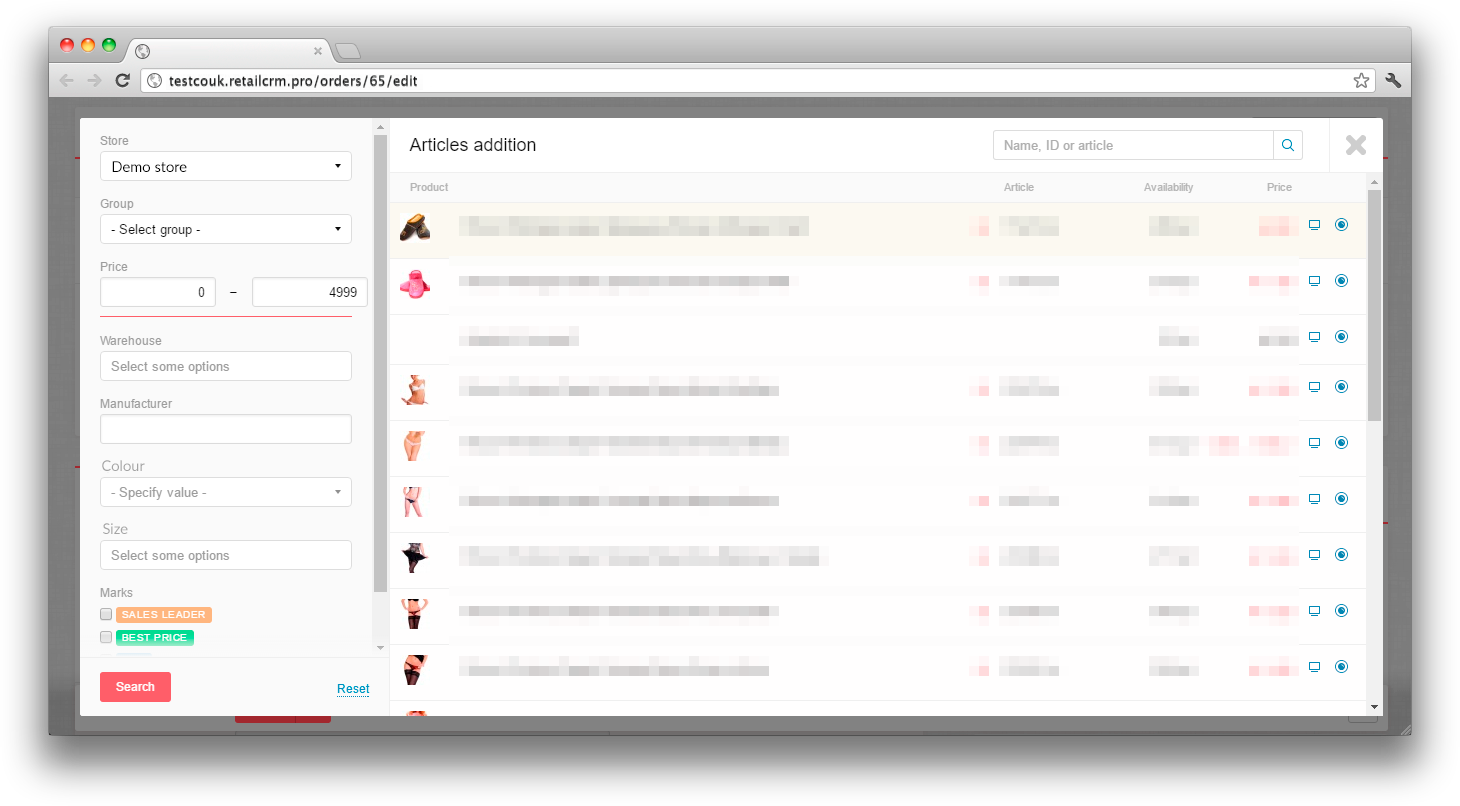
This parameter allows to choose which types of products will be displayed in the filter.
Important: this parameter also affects the list of goods in “Cross sells” and recommendations from RetailRocket system.

The mark set in this field allows to display product cost filter in product adding card.

You need to tick this field if you want to be able to filter product by warehouses.

If system items have manufacturer specified and the box in settings have a mark near this option - you can filter items according to the manufacturer.

This option allows to leave in the list only those products that answer the specified criteria.
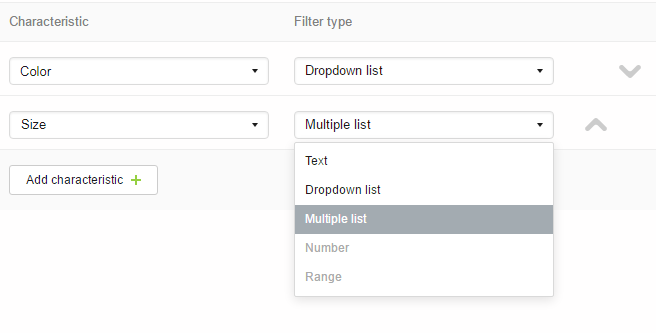
In those cases when the catalogue is loaded from the ICML-file, an additional filter on characteristics is available:
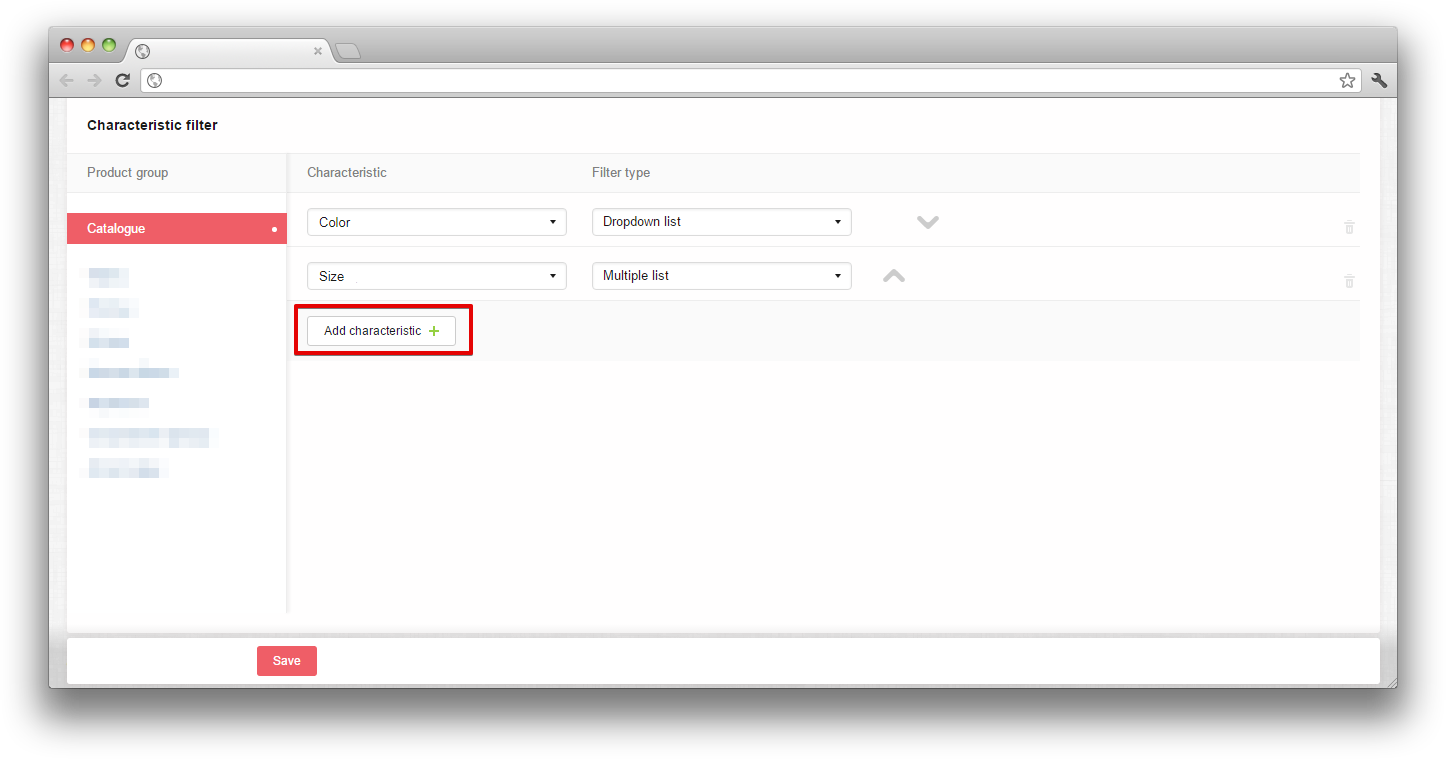
“Add a characteristic” button will allow you to choose additional parameters from the ones stored in ICML for product filtering, the trash bin button - delete unnecessary characteristics.
There are special filter types for each characteristic. Depending on the parameter written in ICML, you can choose the needed filter type:
You can choose as general parameters for the whole catalogue, as well as separately for the concrete product group:

In the line with the group name a dot appears, if the characteristics are specified for it.
If the filter is chosen as for the catalogue, as well as for the product group - the product adding window will look as the following:
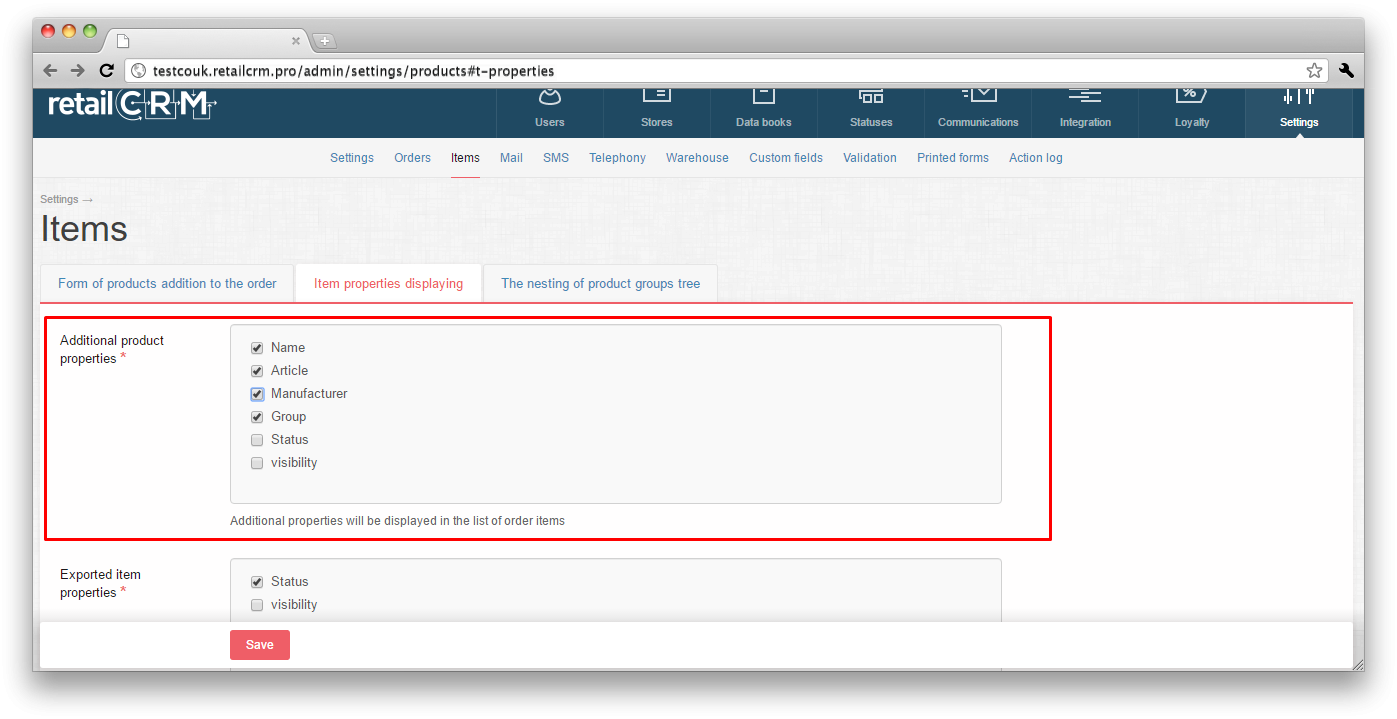
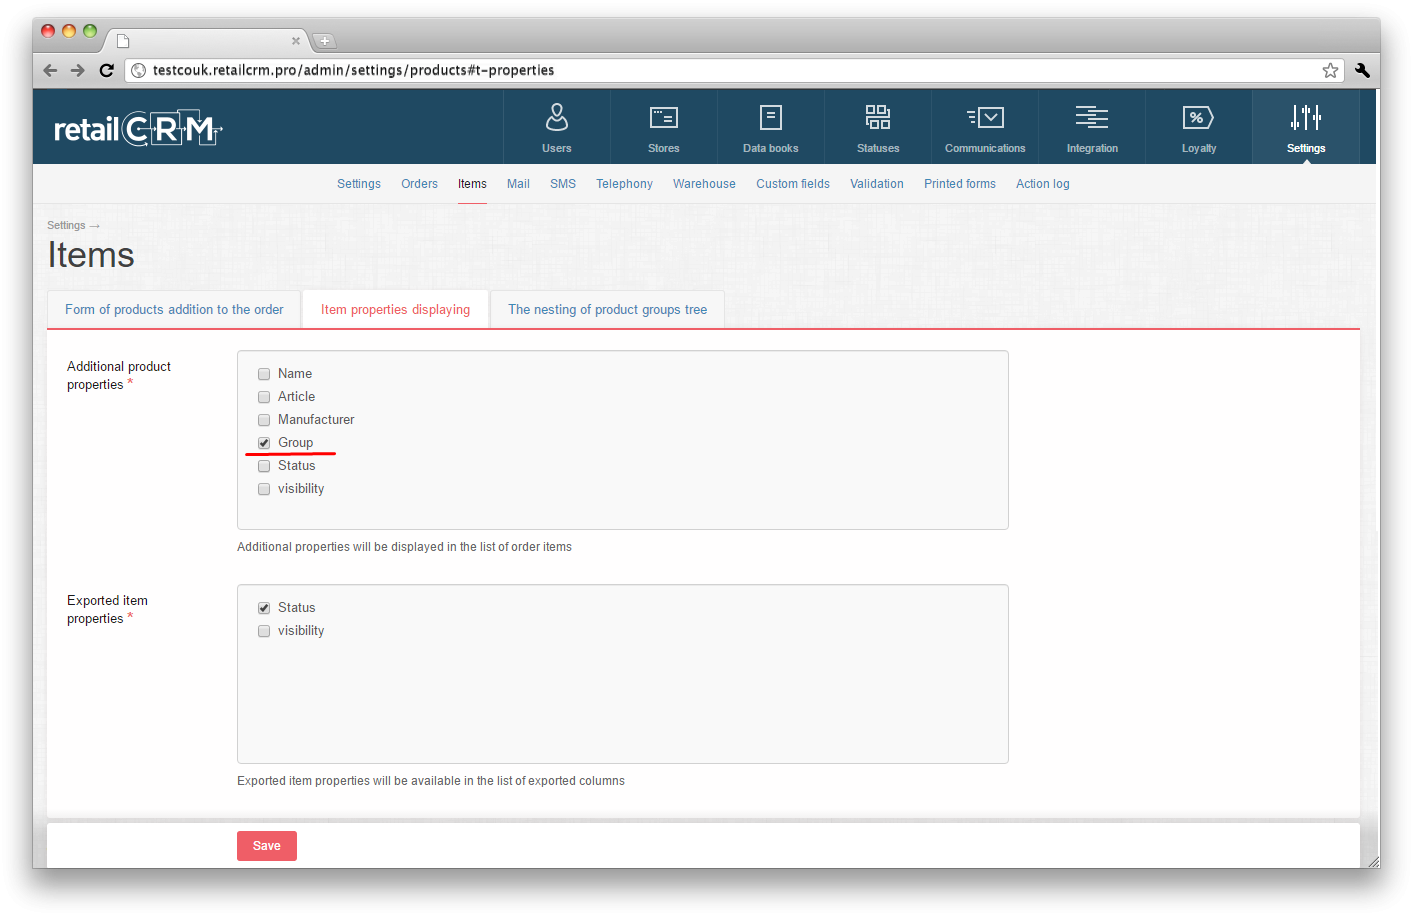
It is possible to set up the fields in system that will be displayed in order content and in the product search filter on the order page and also exported item properties, which are available in the list of exported columns of order table.
Let`s have a look at «Additional product properties».
Here are the boxes near the field “Name” ticked. The fields in order content will look under this setting as the following:
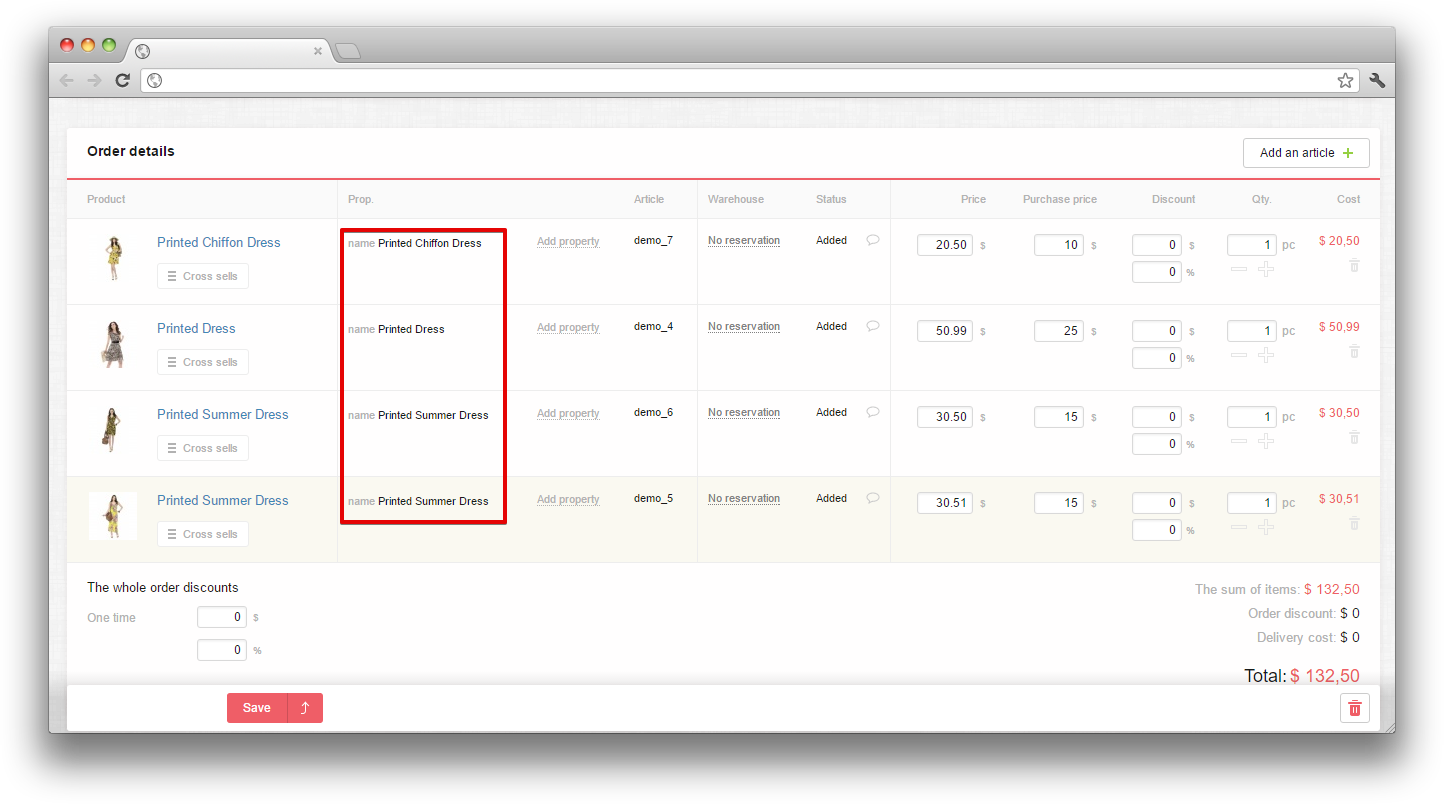
Now let’s remove the tick from “Name” and put it to “Group”.
The products in order content will look as this.

Let`s have a look at «Exported item properties».
With the aid of this feature you can activate properties, which will be available for exporting in list of order table columns.

For example, you can activate «Status» property.
Then go to «Orders» section and press the «Export table» button.
There will be «Product properties» section, where activated properties is being displayed, at the bottom of «Export table» window.

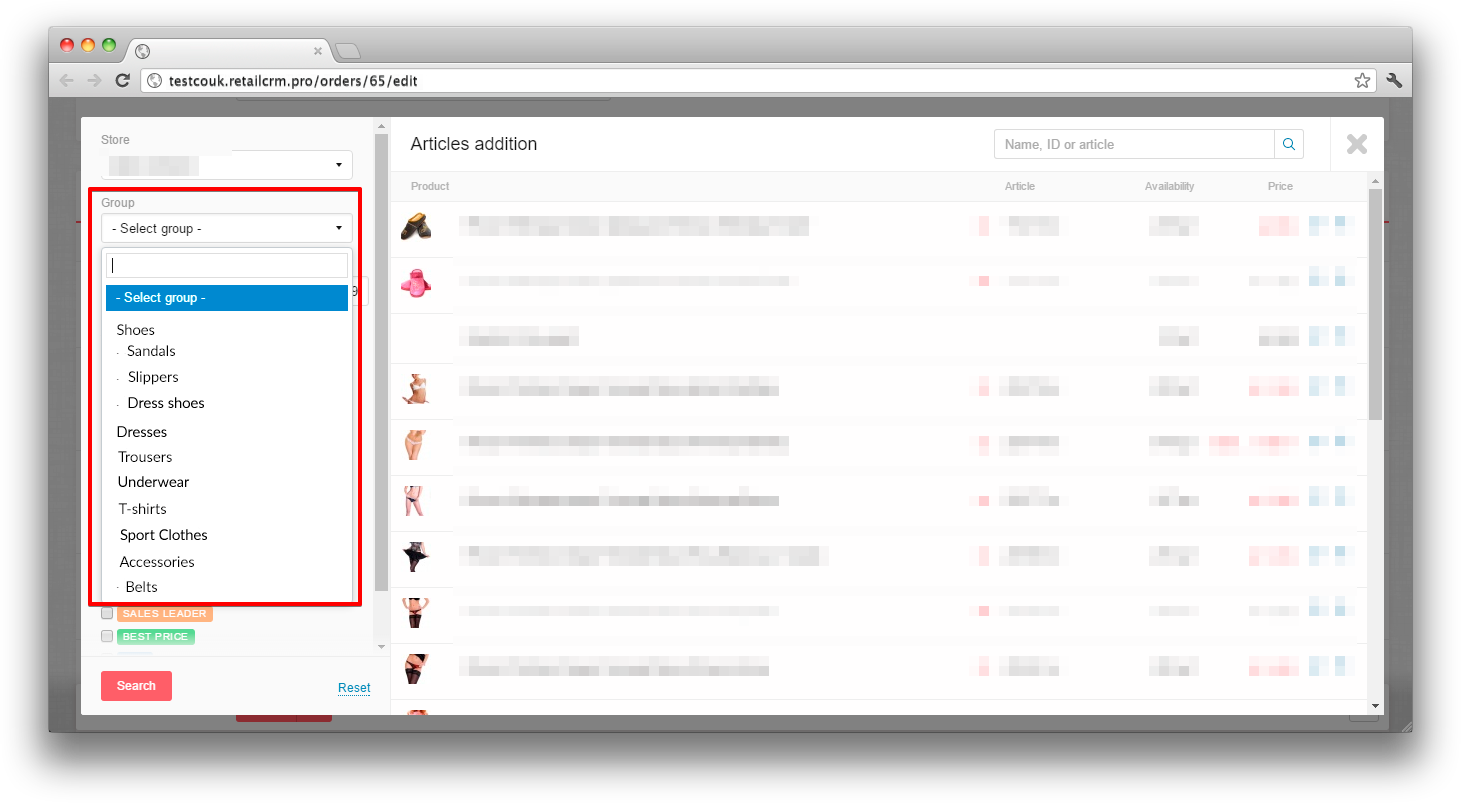
We speak about the number of nesting levels for the catalogue tree. If the catalogue has a multilevel structure and it is not convenient to choose products from a single list, then it’s better to provide for catalogue nesting and specify this setting. It is done in section Administration - Settings - Products, see the screenshot below:
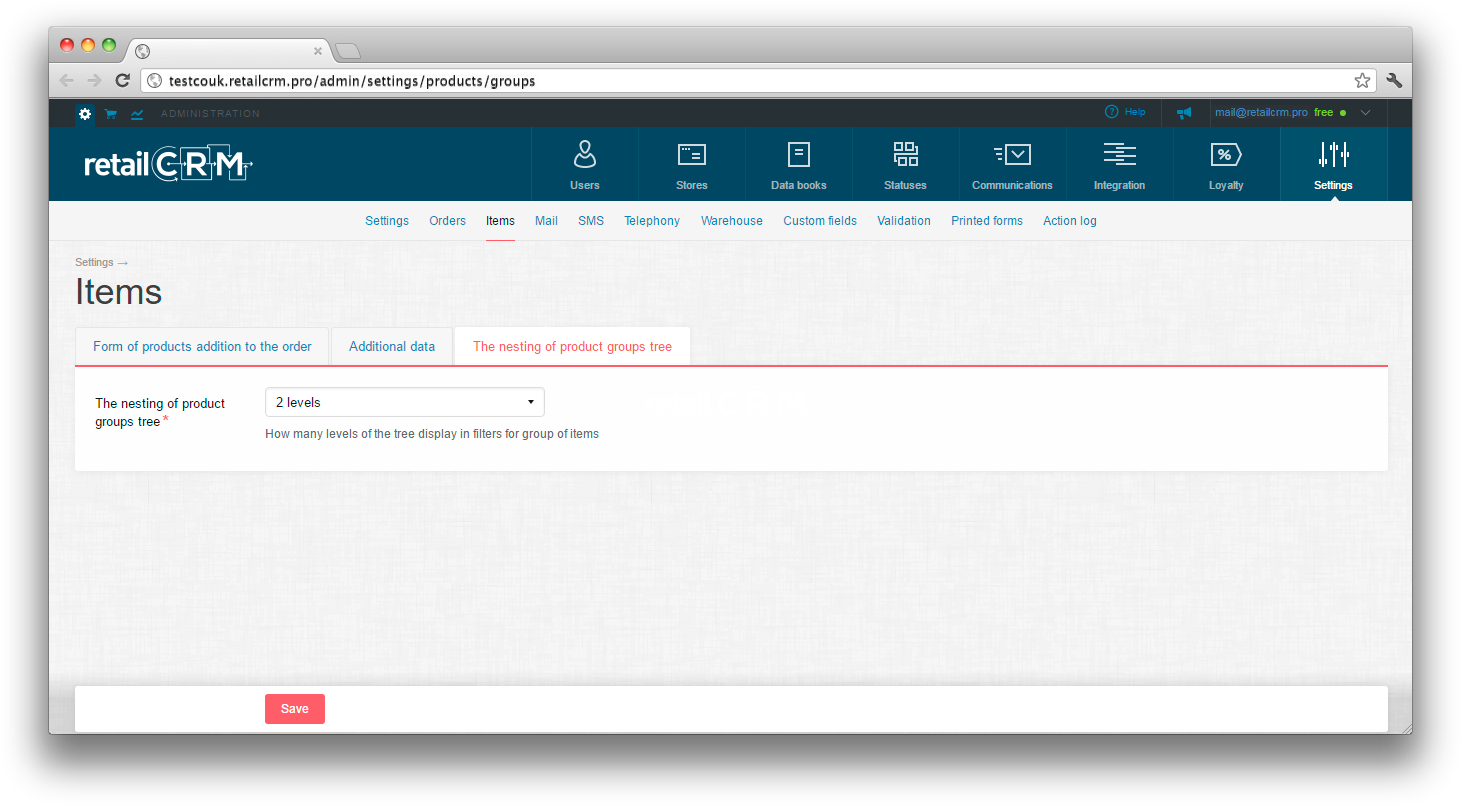
The number of catalogue levels will be shown in product group filter in “Products” section and in the form of adding products to order. “Products” section example:

The example of product to order adding form:
This section describes the functions available in “Mailing” tab on the “Settings” page and the way you can work with them.
Here, in the field “From”, if you want the name of e-shop to be displayed instead of usual email address, you need to write in the email address and the name of mail sender. If you want the service to work correct, you need to specify these values in “Default” section and the setting will be applied to all shops shops conected to the system. If you need to specify the individual parameters (the mail sender name and the email address), the corresponding fields near each shop name are filled. For high email delivery rate it is reccommended to set SPF and DKIM in DNS domailn writings, to which email boxes refer to. Read more about the setting in section Setting SPF and DKIM domain for email sending.
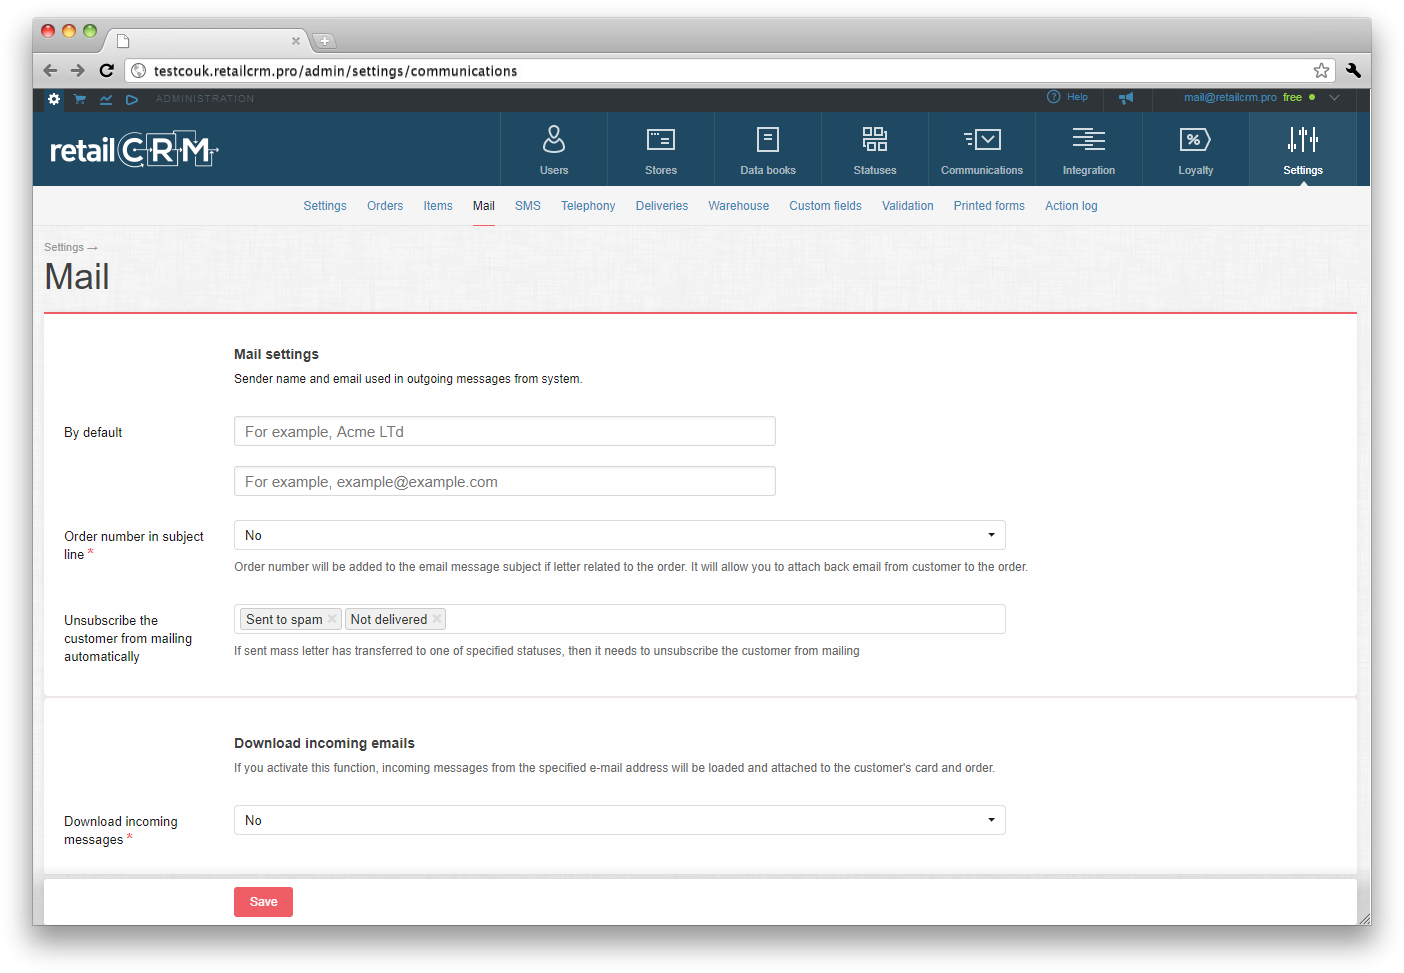
The next field “Order number in the email topic” means that system will add order number to the topic of the sending email.
If you turn on this option, order number will be added to the topic of all letters that are being sent from the order card. If the customer answers such letter, system will attach it to corresponding order, providing that incoming mail dowload setting is turned on.
Setting "Unsubscribe the customer from mailing automatically" is used in case, if sent mass letter was transferred into the one of specified statuses. Thus the customer will be unsubscribed from mailing automatically. It is necessary in order to avoid disturbing of customers and for ensuring of high level of letters deliverability. Causes of ignoring letters by customers may be the following: loss of interest, too frequent mailing, etc.
Note: customers, which were unsubscribe automatically, are not included to "Unsubscribed" indicator in analytics.
If you choose “Yes” value on the “Mailing” tab in the field «Download incoming email», the list of custom fields will open. This setting allows to receive and browse incoming email, that come to the shop email box, right inside system.
Note: average letters download time is about 6 minutes. But it depends on server load. First letters download can take up to 4 hours.

Read about the settings necessary for your email server in the email service documentation, for example:
Yandex http://help.yandex.ru/mail/mail-clients.xml#imap
Mail.ru https://help.mail.ru/mail-help/mailer/popsmtp
Google https://support.google.com/mail/troubleshooter/1668960?hl=ru
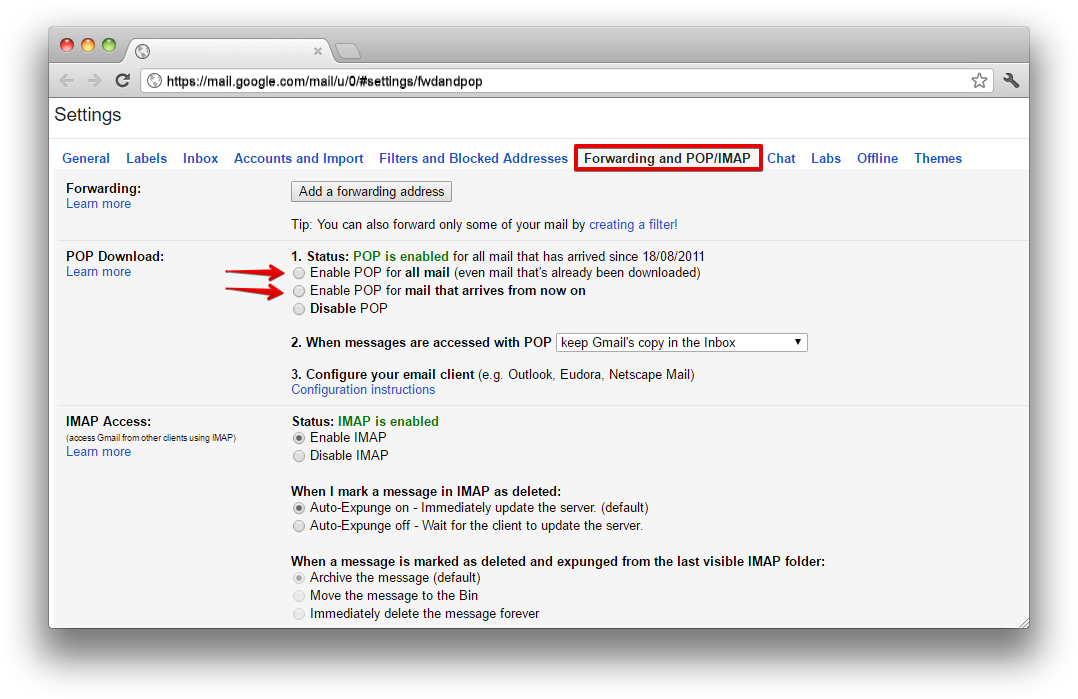
Gmail needs additional settings in the email service itself. Yo need to go to page https://mail.google.com/, press the gear and choose “Settings” option.

Then you need to go to section Transferring and POP/IMAP and put a dot near “Turn on IMAP” for IMAP protocol setting and save changes.
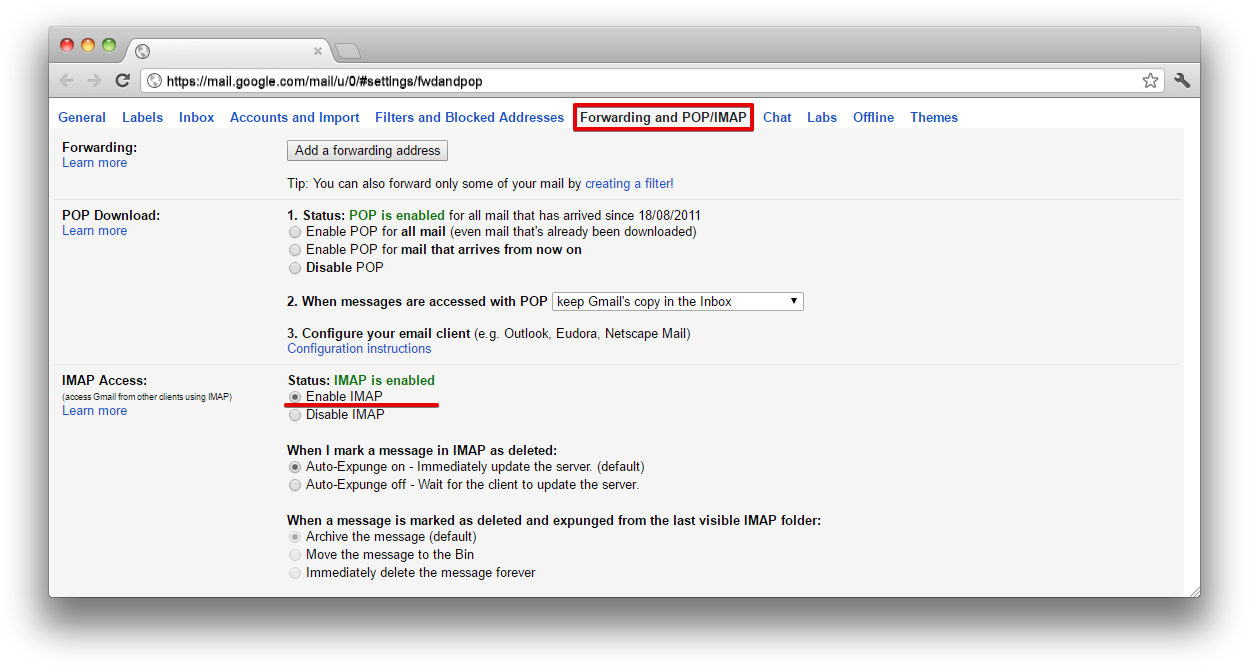
There are 2 variants for POP protocol setting: the protocol is turned on for all letters (even for those that have been downloaded), and the protocol is turned on for letters received starting from the current moment, You need to choose the most appropriate variant and save settings.
Important! The incoming and outgoing mail boxes can be different.
After specifying settings of Your mail server, letters from customers, sent to the e-shop email, will be automatically attached to system customers according to the email address. In case when individual emails are set for all shops, you need to set forwarding from all email boxes to a single one and assign it for the incoming mail download.
The field «Delete dowloaded messages» means deletion of incoming letters in the interface of your mailing server.
The field «Notify manager» means that a notification about incoming letter will come to the manager, who is assigned to the customer.

The field «Create customer, if not found» allows to create customer card in system if there were no customers or orders with current e-mail.
Important! When this option is turned on, all letters that came to this email box, are checked. After that a customer card is created, in which only the field “E-mail” is filled.
In the field «Manager group for new customers» you need to specify a user group, in which new customers will be assigned to co-workers in the view of manager status. The allocation will work in the following way: primarily the orders will be allocated uniformly among those managers, who has set status “Free”. If there is no “free” manager, the allocation will made among those co-workers, who have statuses “At lunch”, “Busy”, “Break” and among those co-workers who are not authorised in system at the moment.
As a result of creation of the customer, the manager gets 2 notifications from the system: the first one notifies that a customer has been assigned to the manager, and the second - directly about the incoming email from the customer.
You can specify an individual sender name for each shop. If the name is not specified, the default name will be used if it’s present. SMS sender name setting allows you to specify your own alphabetical SMS sender name, which your shop customer will see. More than that, the rate of receiving SMS with alphabetical sender is much higher and reaches 95-97%.
Important: in case of absence of the sender name for the shop, the SMS will be sent with the name “RMSG”.

Write in the name ot the corresponding field, which you want your customers to see in SMS in the field “From”. You can specify general sender name in the line “By default” for all the connected shops or fill in individually for each shop. The name will be automatically sent for verification and during 2-3 days You will see, that the message became green with text “Veryfied”.
Important: Sender name must consist only of latin letters, digits and underline characters.
To verify sender name you need to fill the following fields in shop requisites legal name, TIN and Country.
Note: it is recommended to connect turbosms.ua to send SMS on the territory of Ukraine account, and rocketsms.by on the territory of Belorussia.
You can limit sending time of SMS that are automatically sent by the system. If you press “Yes” value in the field “Limit sending time”, an area will open, where you can insert the starting and ending time for SMS sending.

For example, if you set the time from 10:00 to 20:00, and the SMS is sent by manager or trigger in 21:50, then the message in fact will be sent at 10:00 on the following day.
Telephony settings are situated at Administration > Settings > Telephony. You can specify general settings for any connected telephony services in the “Telephony” tab.
The setting “Consider user status in pop-up windows” is responsible for pop-up windows of incoming calls that will get only users in free status.

The setting «Attach call history to customers and orders» allows to attach all incoming and outgoing calls to Customer and Order thing by telephone number.
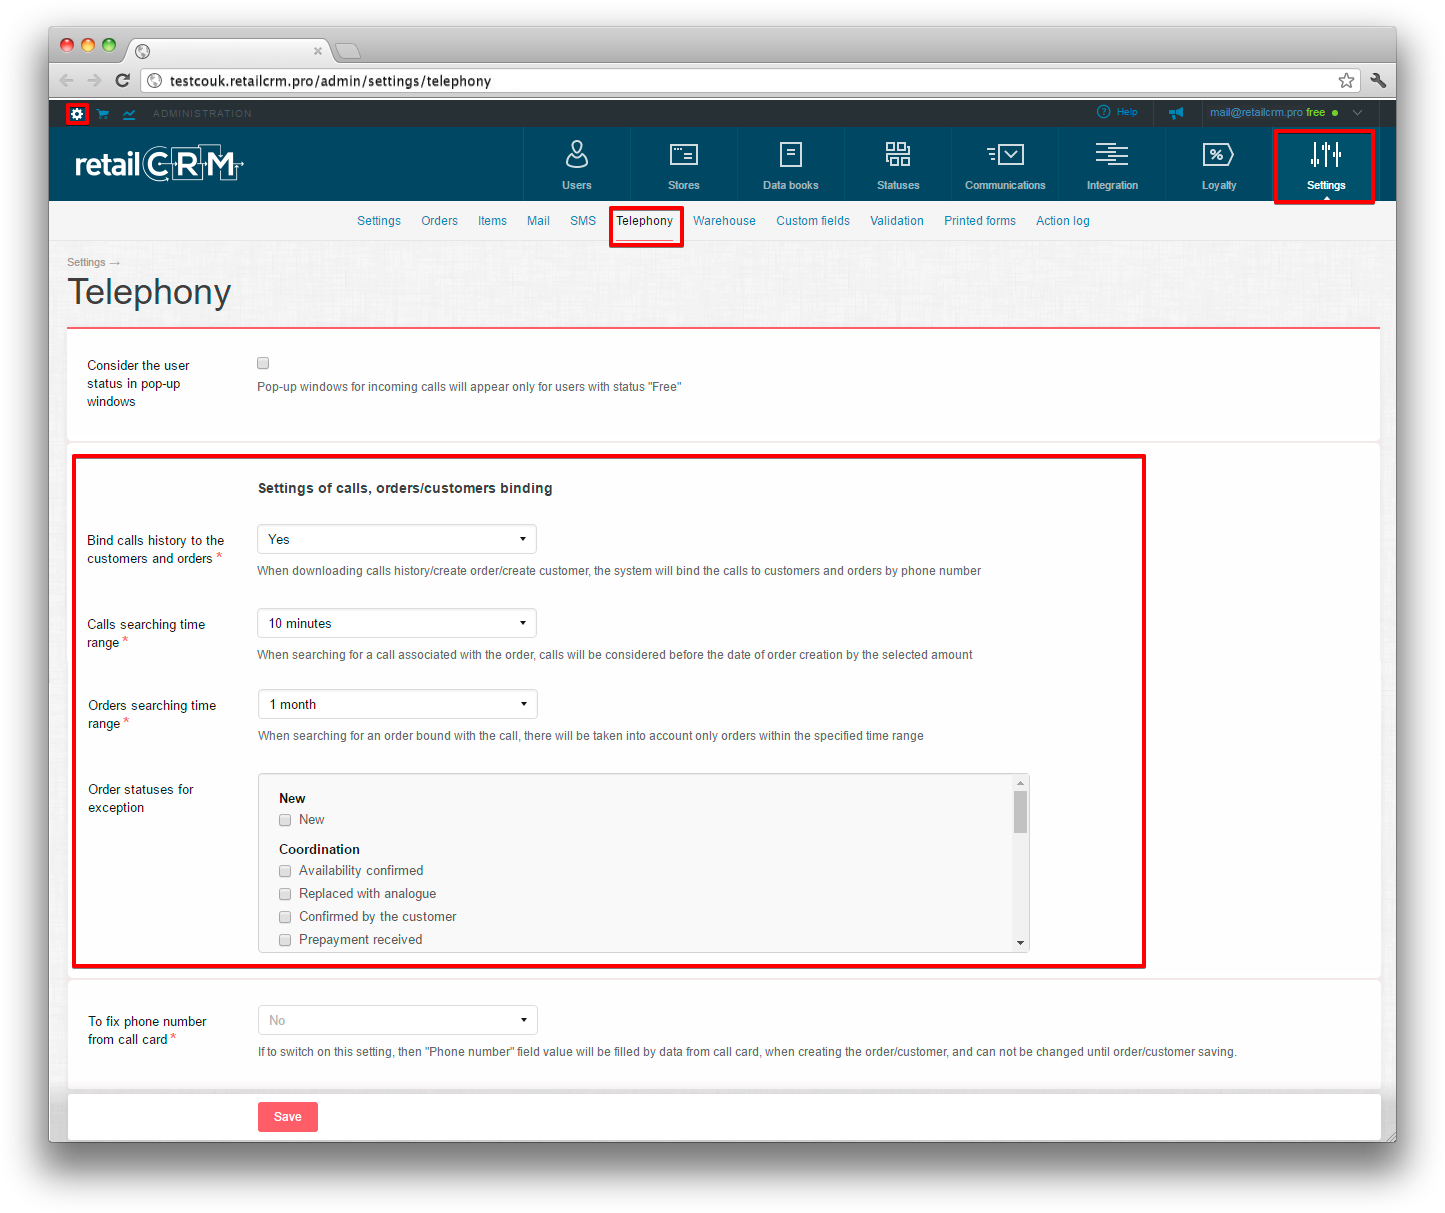
If you choose “No”, no any other field will be displayed. If you choose “Yes”, an option to specify the range will appear, during which the customer or the order will be searched by telephone number.
The field «Order search time range» allows to set the time range, during which calls will be attached to the order, created during this time range.
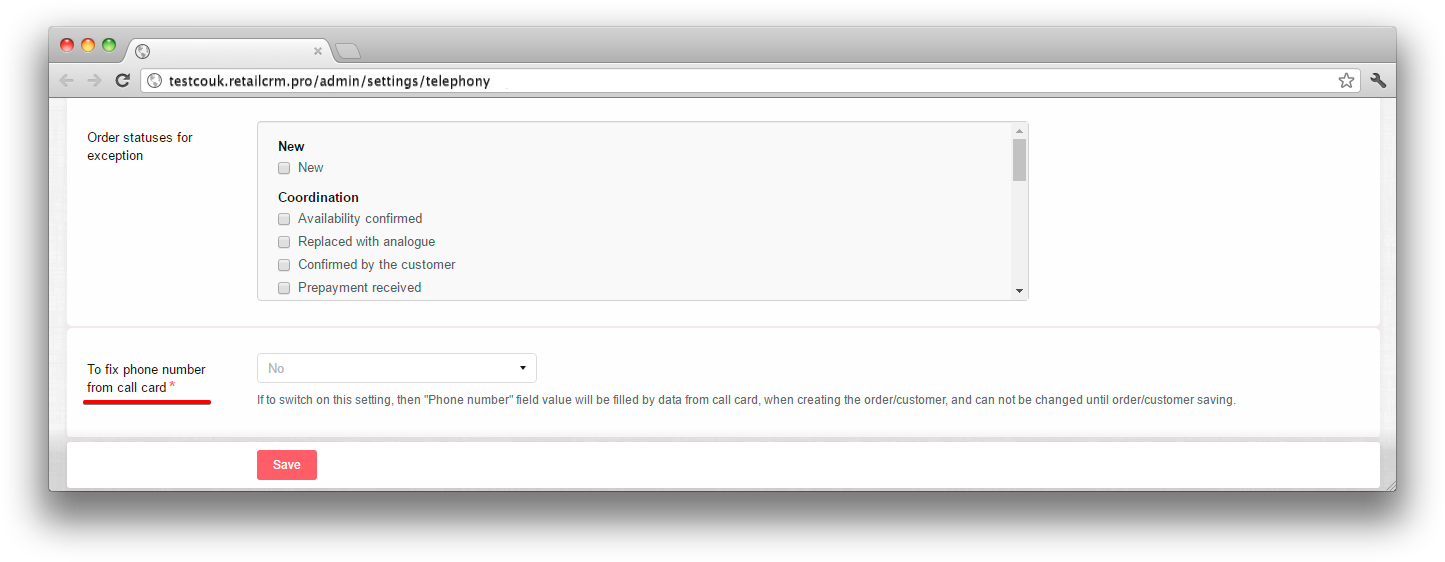
The setting «Order statuses to exclude» allows to exclude calls attachment to the customer, relying on order statuses.
For example, if you use order status “Double” for orders, which in fact repeat data, i.e. telephone number will coincide with the telephone number from the main order, then tick the box near this status in setting “Order statuses to exclude”, for all the calls to be attached to proper orders and customers.
In the field «Calls search time range» time settings are set after order creation, during which incoming and outgoing customer calls will be considered.
By incoming call to system, it performs search in the existing telephone base on the fact of presence of the same telephone number. If telephone numbers coincide, then all the calls made from this number are attached to the customer.
In these two cases the search is made without a definite time range, set in the telephony settings. (demo.retailcrm.pro/admin/settings/telephony)
In case of receiving a phone call from the customer who already has created an order in system, the system will perform search on the fact of presence the identical telephone number in the existing customer base, in order to attach the order to the proper customer. When searching for the order attached to the call, the orders in terms of the time range specified in system settings will be considered.
Note: there is a limit by telephony types depending on countries. I.e. telephony choice depends on the country system specified in settings.
«Fix number from the call card» setting is responsible for the fact, that by creating order/customer from the call card, the “Phone number” field will be filled by call card data and you won’t be able to change it untill the moment of saving the order/customer.
There is an opportunity to disable "Delivery" block on the order page. All columns and filters related with delivery, will be also disabled in orders list.
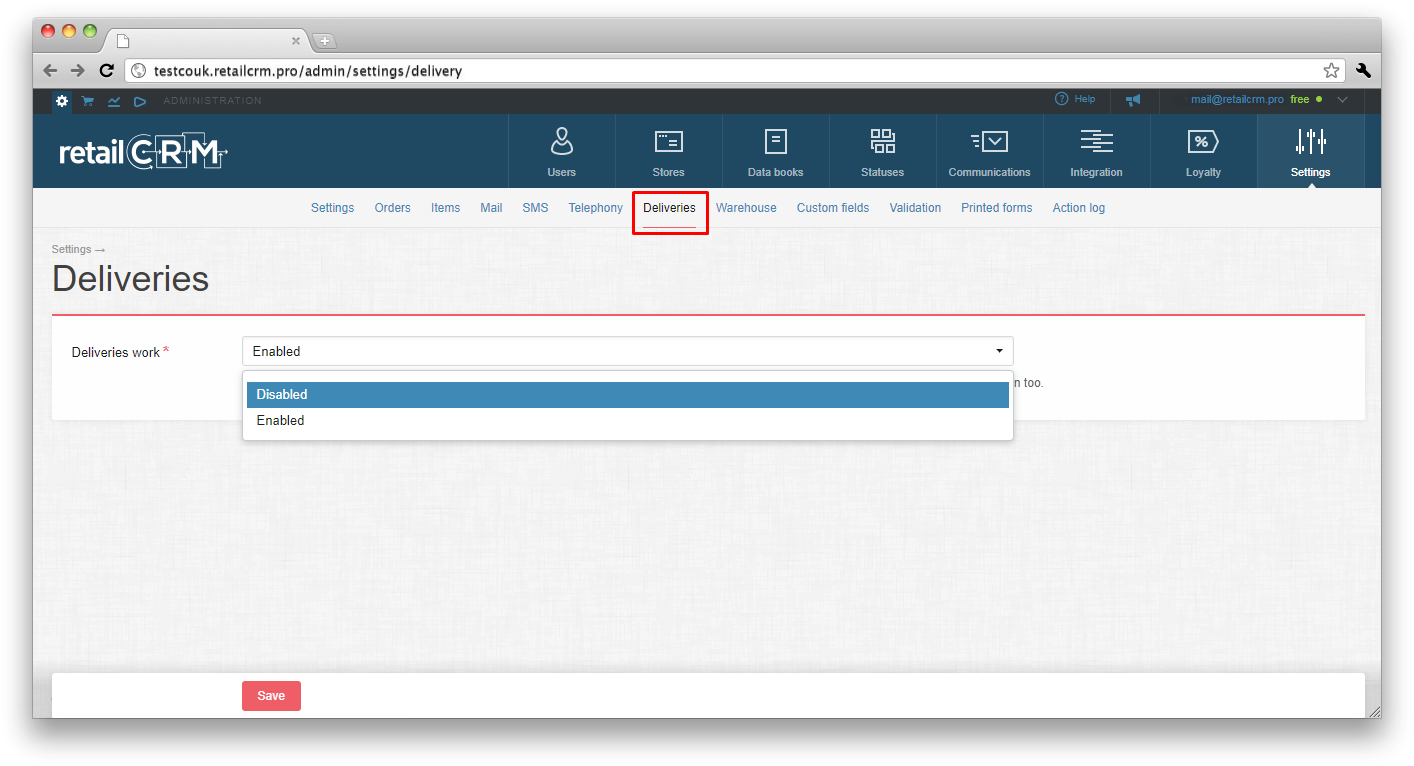
"Delivery" block in the order will not be displayed after disabling.
You can setup warehouse work, leftovers reservation and shipping in the “Warehouse” section.
“Main” tab is intended to set warehouses and leftovers reservation.
Note that some of these settings are connected with order processing and after activating them you will see new subsections to work with.
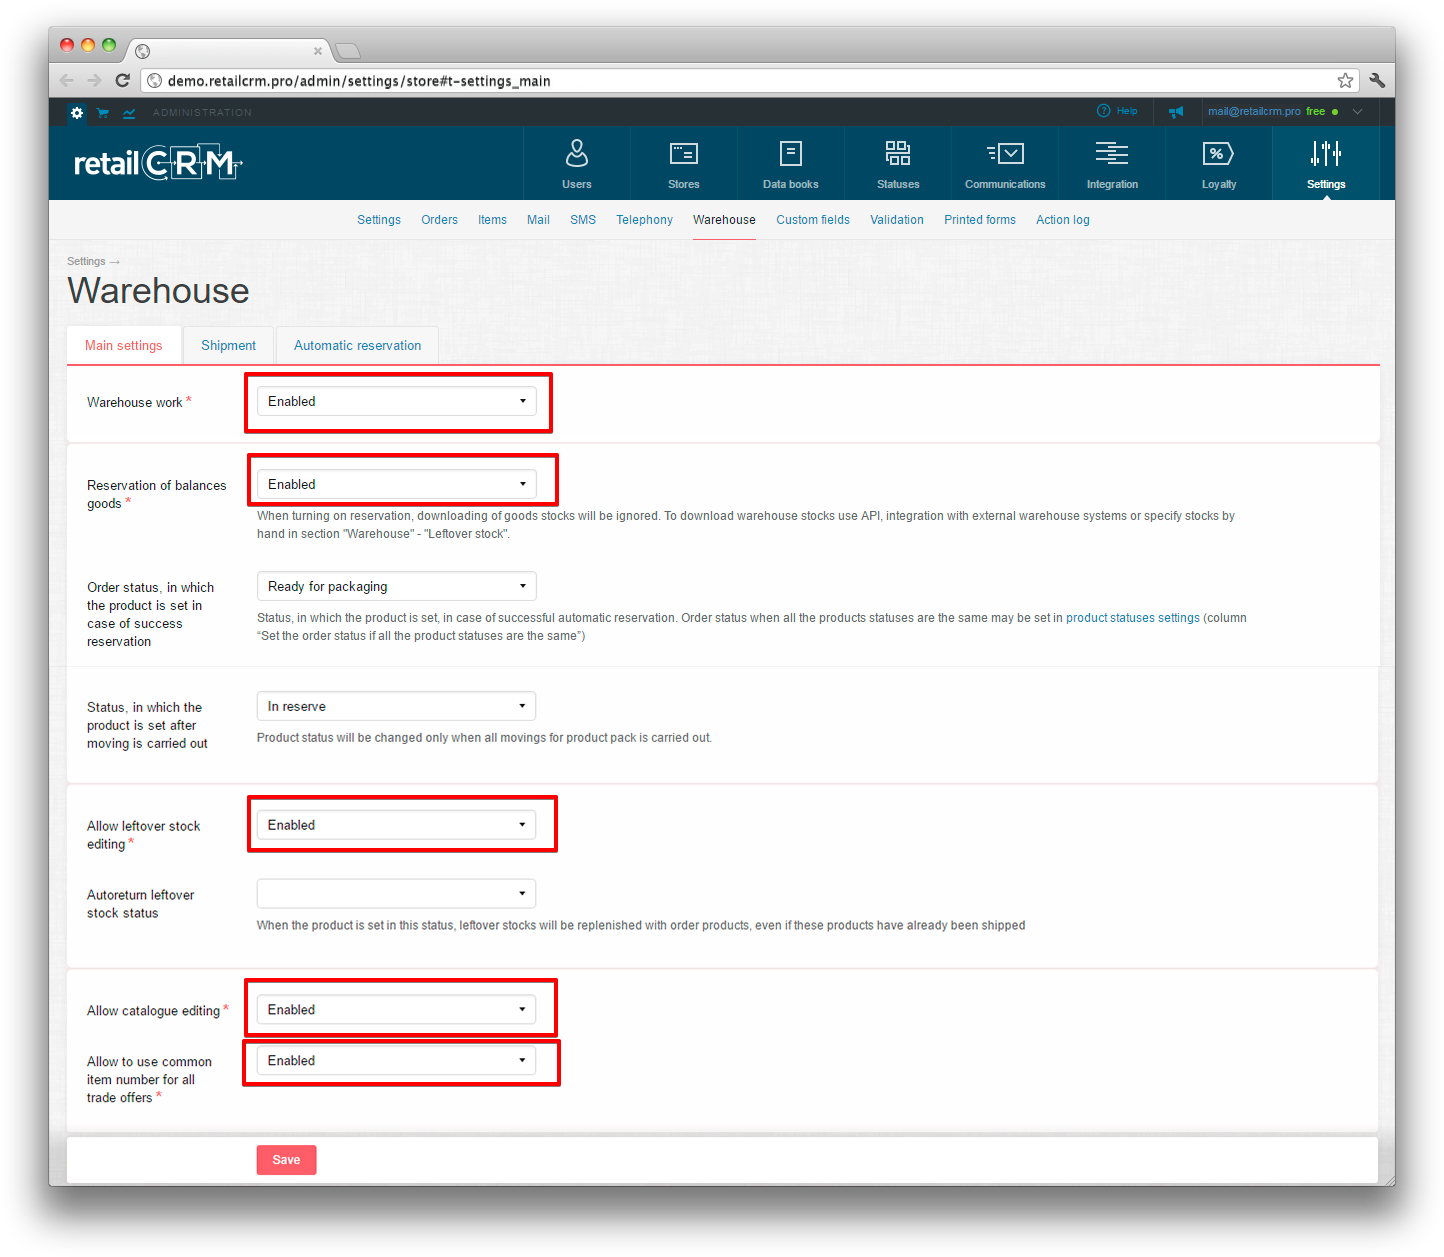
Read in the article Choosing warehouse for products how to work with an order when the setting “Work with warehouses” is turned on.
''Note: if “Warehouse work” is disabled, in “Activity -> Items” you will see only two subsections “Products” and “Shipment of orders to the delivery service”. After enabling two more subsections will appear “Products collecting from warehouses” and “Movement of goods”.''
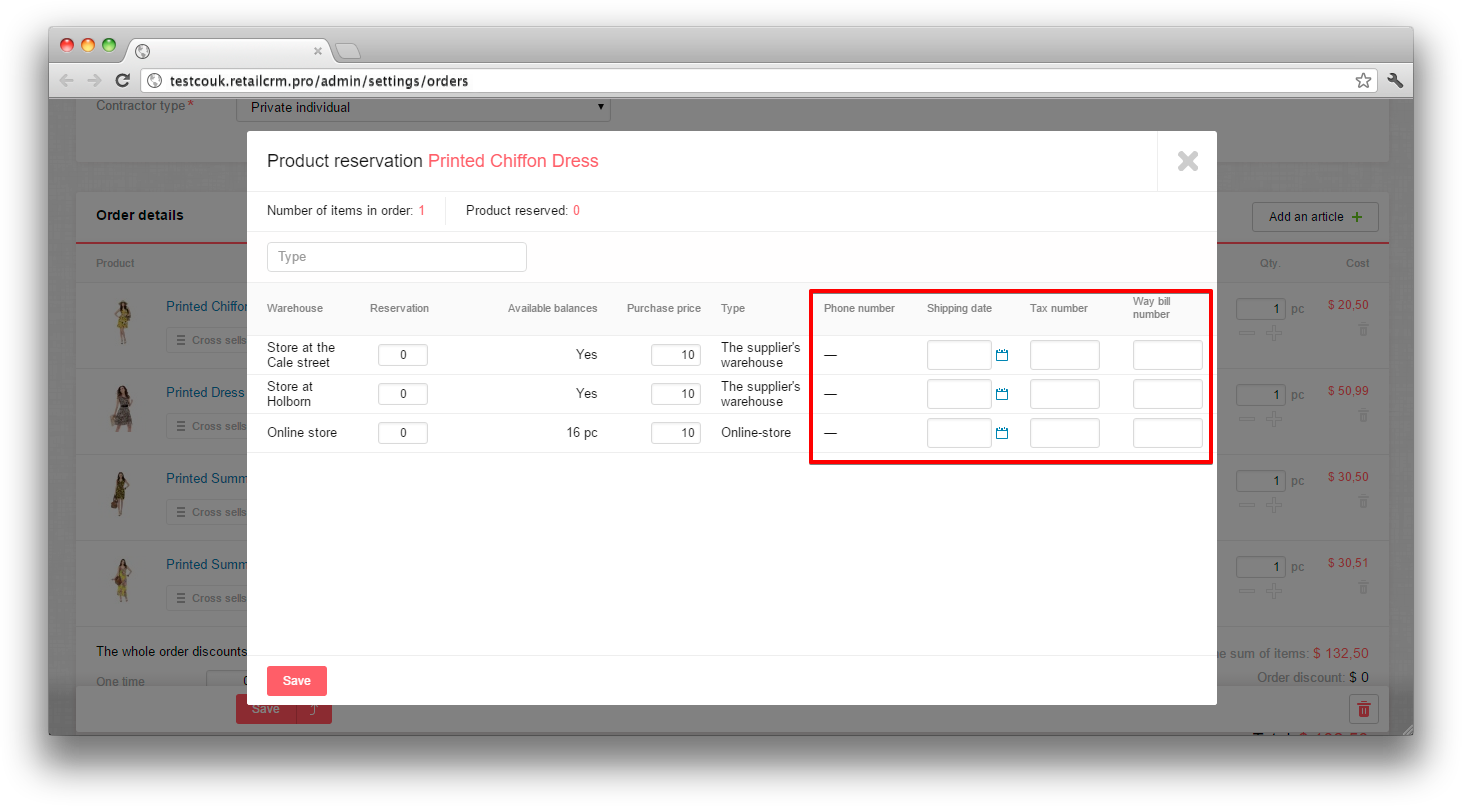
Read in the article Product reservation in the view of warehouse leftovers how to work with an order when the setting “Product leftovers reservation” is turned on.
With the help of «Allow catalogue editing» setting you can edit catalogue manually and add new items. Read more about it in sections Product editing.
With the help of «Allow leftovers editing» setting you can manually edit products leftovers. Read more about it in section Product leftovers editing.
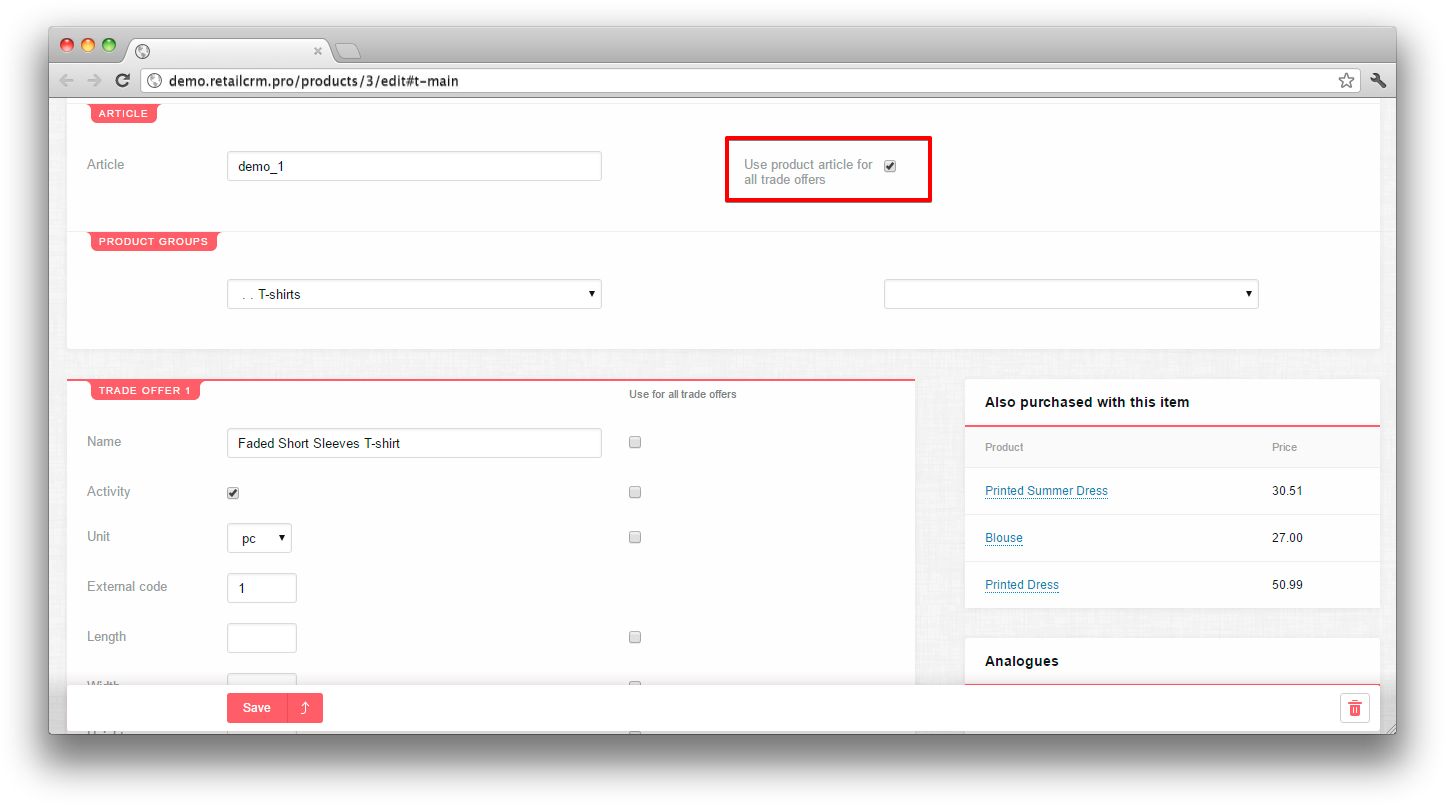
The setting “Allow to use general article for all product offers” is used in case if the same article is written for all trade offers. If this option is enabled, the product card will have the box “General article for all product offers” chosen and the product article will be in a single field - general for all product offers.
“Shipping” tab is used for shipping warehouse configuring. Allows to set up default warehouse for one or several shops or not to set them at all.

If there is a flag near the option “Use for all shops”, then there will be a single shipping warehouse by default for all shops.

If there is no flag near the option “Use for all shops”, then you can set default shipping warehouse for each shop.
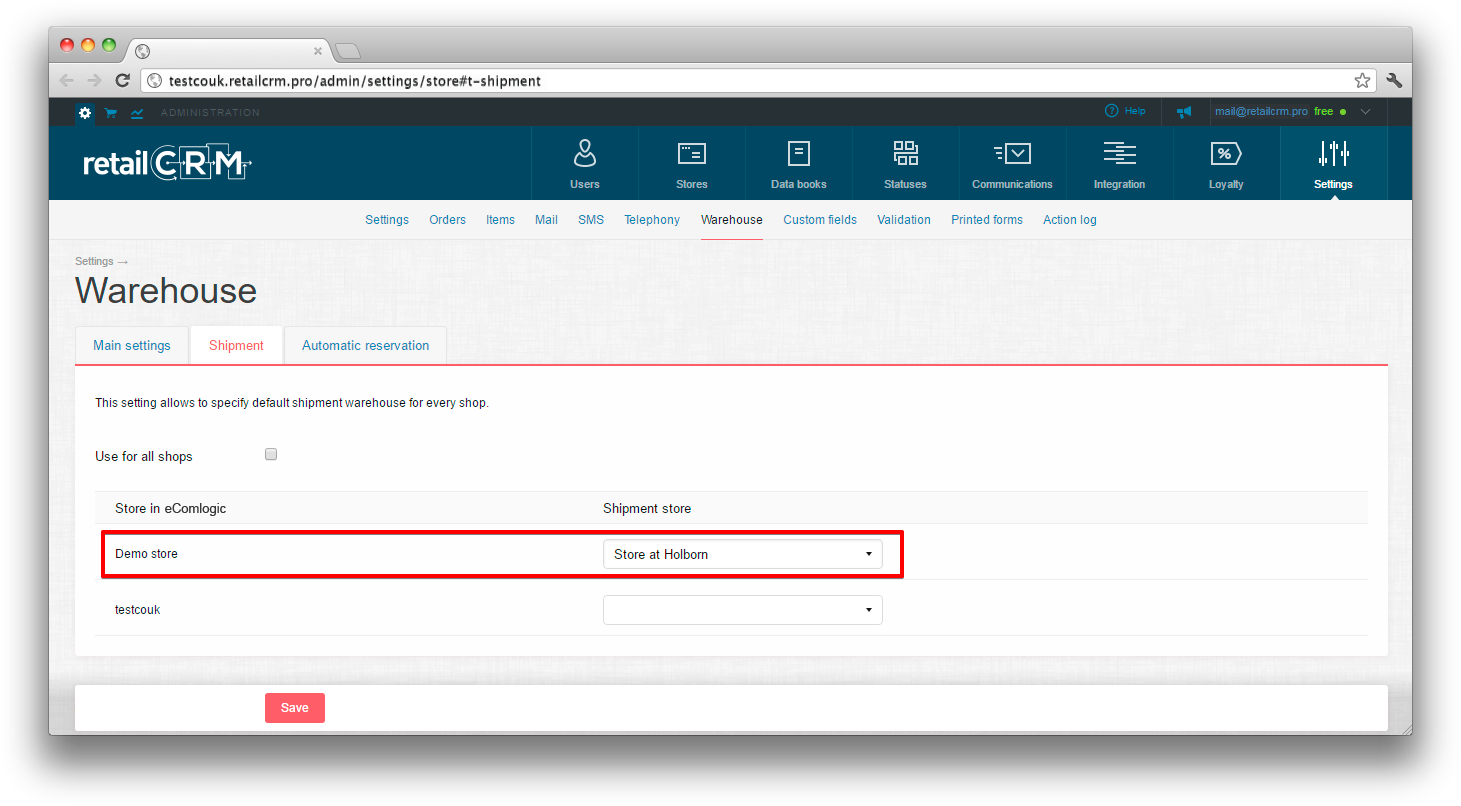
If the default shipping warehouse is set for the shop, then this field will be automatically filled when choosing shop in order in “Shipment” section.
If the shipment warehouse is not chosen by default in settings, then it needs to be selected in the order manually.
Automatic product reservation is set up on “Automatic reservation” tab. Read more in Autiomatic reservation section.
Additional fields that can be added to order are situated in “Fields configuration” tab. Read more in section Custom fields.
Validations that you can use when working with order or customer cards are configured in the “Validation” tab. Read more in Validation section.
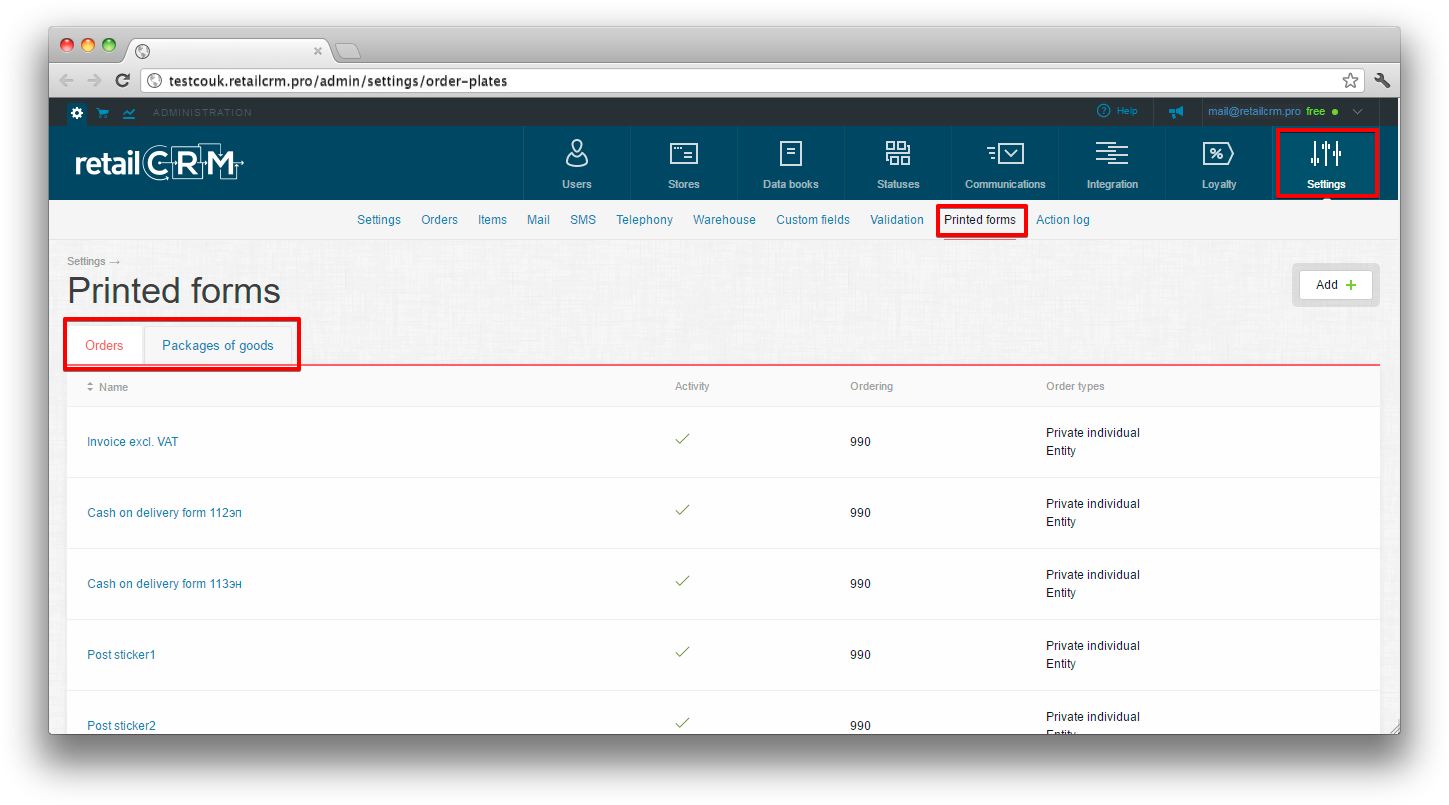
The tab “Printed forms” contains printed forms templates, that are already present in the system. Press “Add” button to create a new printed form template. Stay in the tab “Orders” if you need a printed form for the order. If you need to create a printed form for a product, move to the “Item packages” tab. Read in section Printed forms templates how to configure a printed form template for an order and an item.
In the “Databooks” tab there are lists of values for additional fields of the “List” field type in the order. Read more about why databooks are important in section Databook creation.
Note: entry in action log is being kept not more than 2 weeks.
Actions log keeps records of actions performed in your system. According to them you can understand who deleted an order or a customer, does all of your triggers work or make errors, how the telephone campaign went on, why the order didn’t upload to MoySklad and many other things. All log records have three statuses:
And are subdivided to the following types:
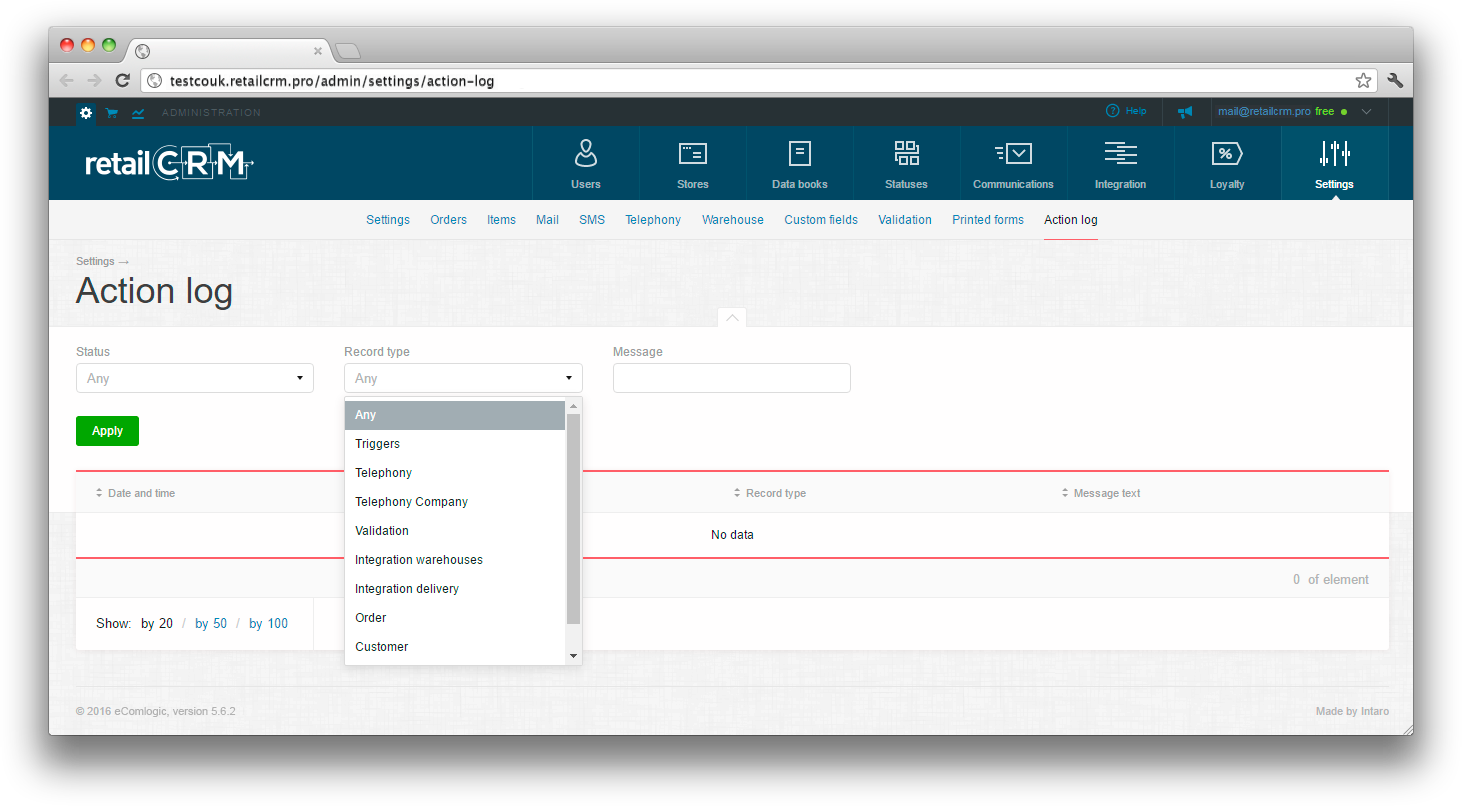
You can filter action log records according to all these parameters. There is also a possibility to search on the record text, if for example you need to find a deleted order. In the message field we insert order number, in our case it’s 53 and get the record about who and when deleted the order.

Or the trigger on order didn’t work and the SMS wasn’t sent to the customer. We write order number 143177 in the message field again and get the records where this order is mentioned. From the example below you can see that the trigger didn’t work because the order is missing the telephone number.

You will deal with different IDs in the messages text. They indicate the trigger, template, item and etc. that has left this record. From the example above you can see, that the trigger with ID=31 didn’t work in the order number 143177. This ID is kept in the URL of the trigger (template, item and etc.) page itself. To go to trigger with ID=31 you need to open any trigger (template, item and etc.) and replace the following part to 31 (the ID is already replaced in the example below):

And press Enter. This way you will get on the page with a needed trigger (template, item and etc.).
This subsection displays all user actions in the system. It shows date and time of the action, request url, request method, manager and IP address.
In the URL column you can see the path to which request was made.
There are two request methods - GET and POST.
GET is receiving information from the system server, and POST is sending information to the system server.
For example, going to settings will be considered as a GET request, because the server send information about the section you are currently in, and saving settings will be considered as a POST request, since you send information about data changes to the server.
You can filter all of the above fields. Filtering by IP address mask is also available. For example, 127.0.0.* , where " * " is an arbitrary value.
Note: you can sort this table by date and URL.