To track information on sources the system uses data collected by Universal Analytics service with Universal Analytics standart.
You need to have a Universal Account to register your website in Universal Analytics.
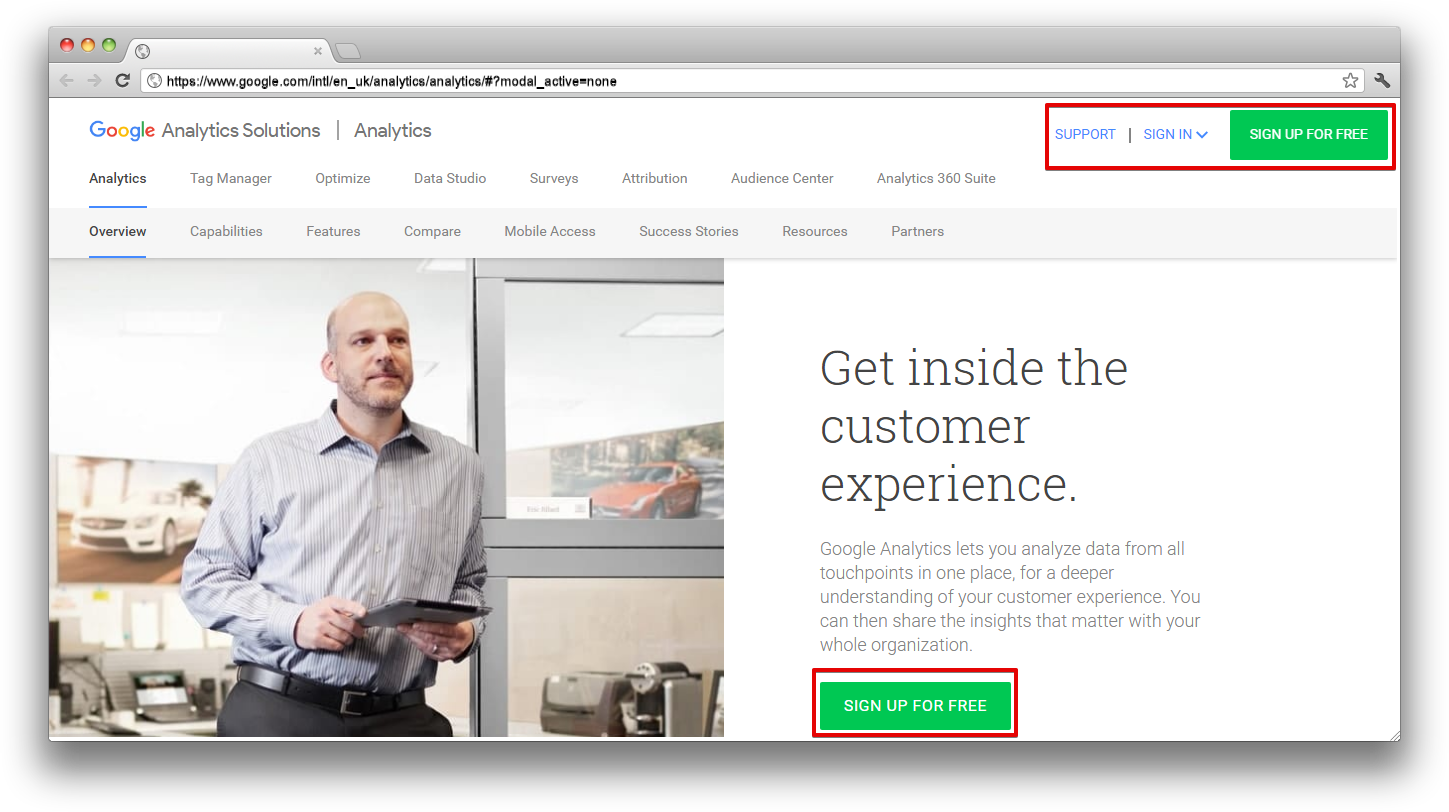
Let’s create a Universal Analytics account.
Universal Analytics - is an extended standart of Google Analytics. Further, the words “Google Analytics” will mean the service in general, and “Universal Analytics” is only the adjustable functionality.
Google recommends to create a new Universal Analytics account for each website.
Creating a Universal Analytics account:
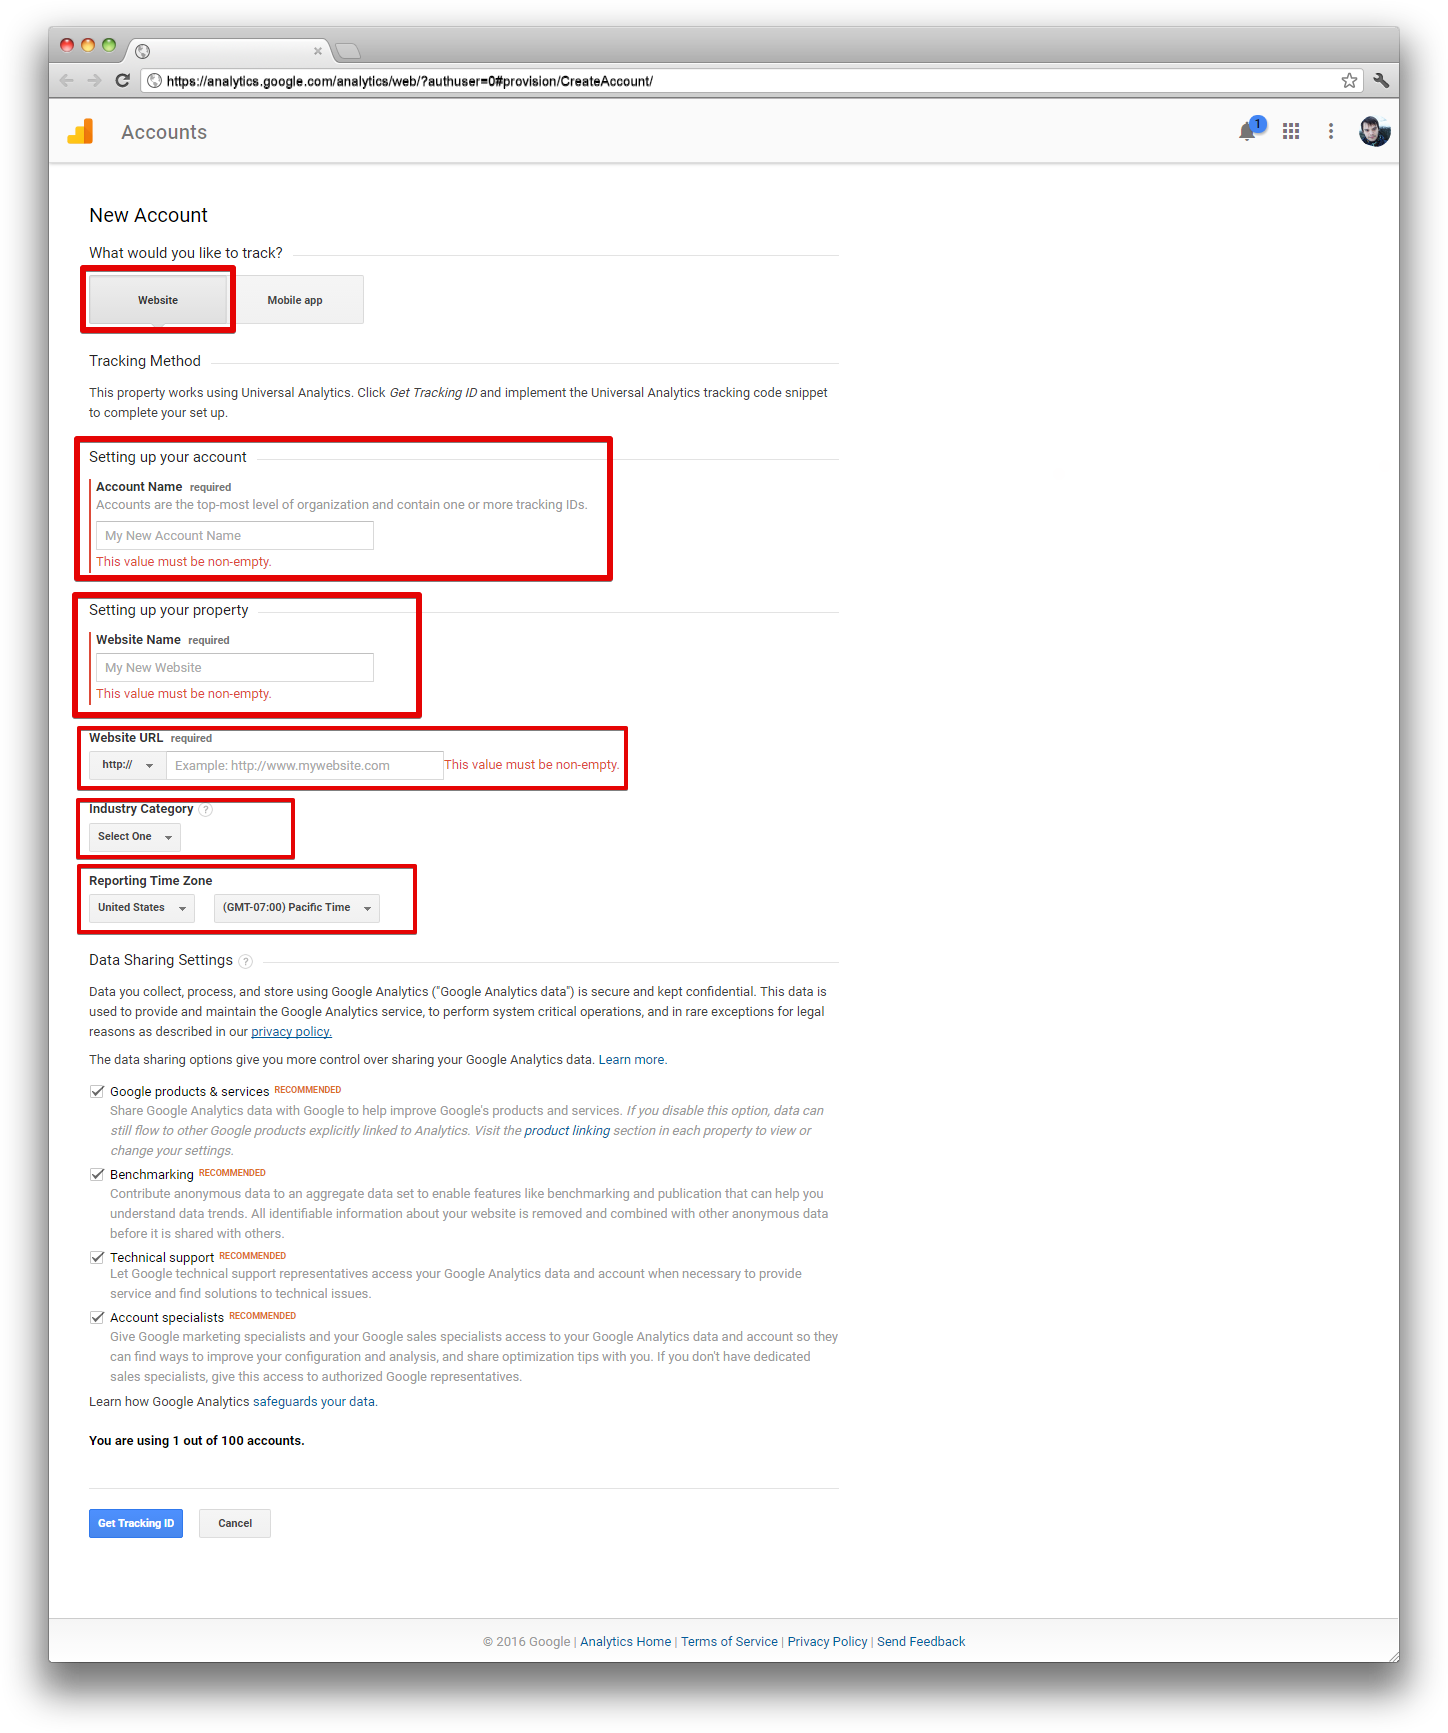
Universal Analytics account creation help.
After creation of Universal Analytics account you will be automatically moved to your Universal Analytics profile page, where the name of your website will be displayed, which you need to track, and the Universal Analytics account number in UA-XXXXXXXX-X format. This code is called “Google Analytics web property identificator” and is unique for each tracked property.
After you have registered Universal Analytics account, you need to configure e-commerce tracking.
If you have already made the configuration, you can start from Integration with the system.
Note: download from Universal Analytics is not supported in demo version of the system.
Settings in Universal Analytics
To turn on e-commerce tracking in Universal Analytics, make the following steps:

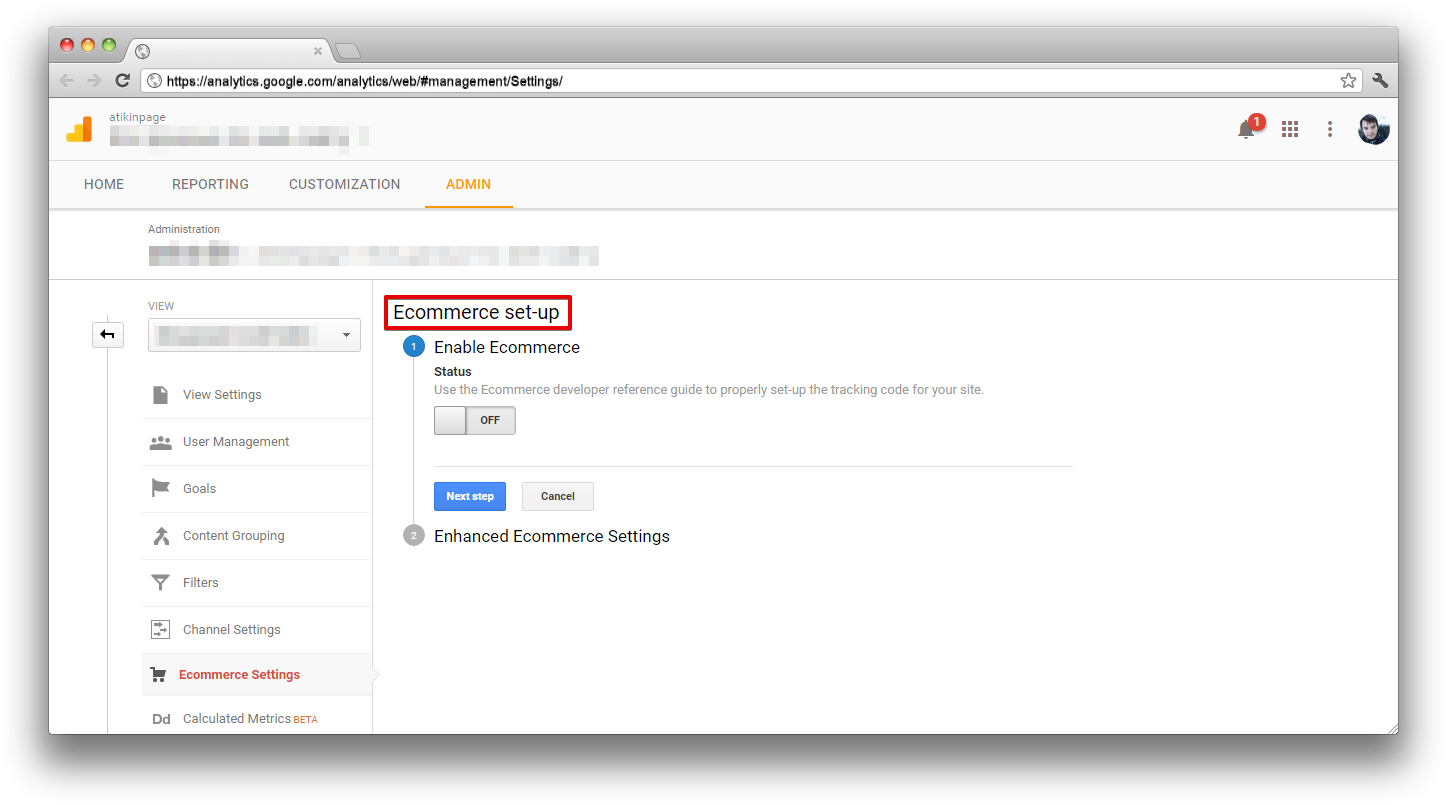
An important moment in View section is Currency settings. You need to specify the same currency, that is set up and used in the system. By default it is US dollar, but your shop can use different currencies.

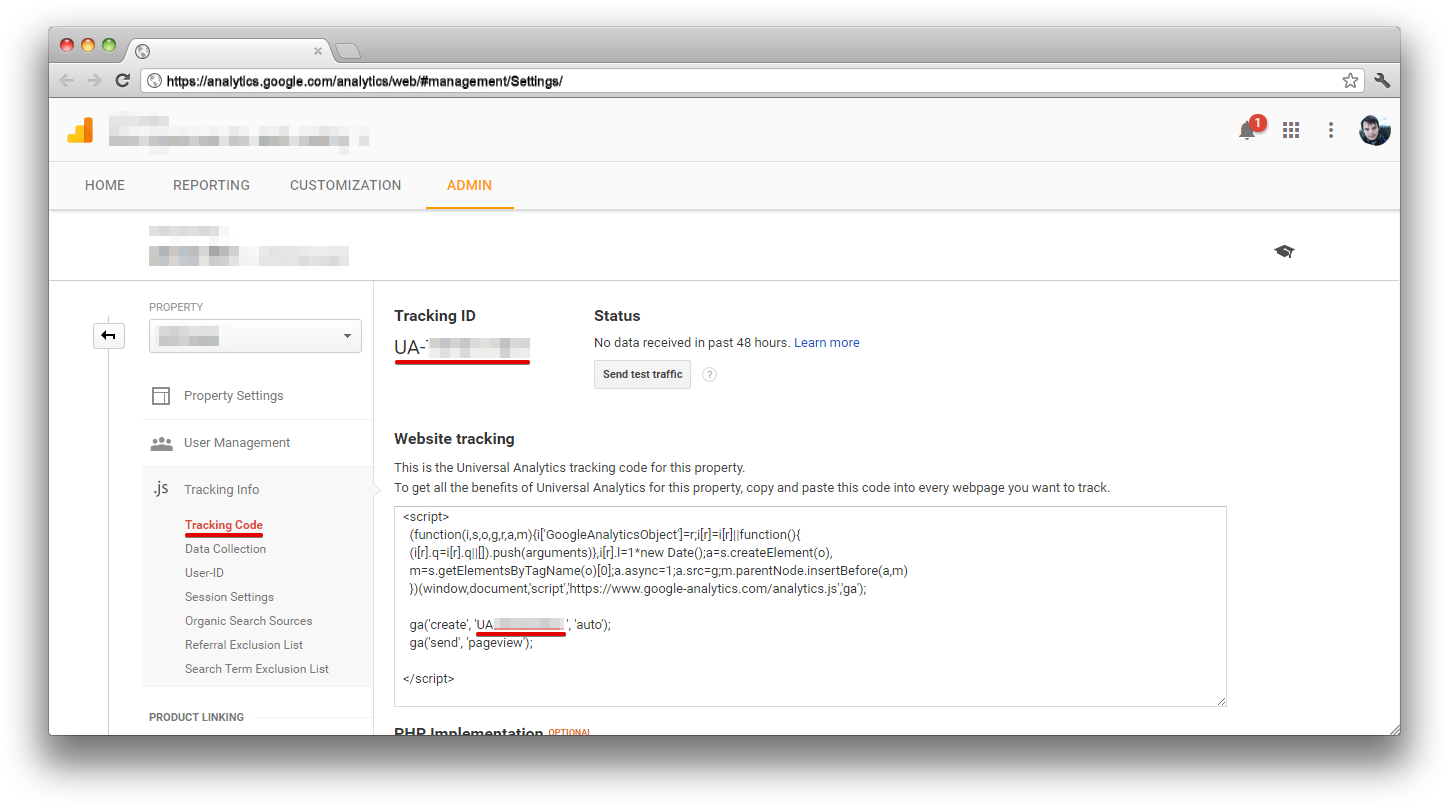
Getting tracking ID
Universal Analytics tracking ID is a script in the Javascript language, that is executed by the browser of your website user. With its help the data about user activity will be sent to Universal Analytics.
To get the tracking ID you need:
You will see the following code:
<script type="text/javascript">
 (function(i,s,o,g,r,a,m){i['GoogleAnalyticsObject']=r;i[r]=i[r]||function(){
 (i[r].q=i[r].q||[]).push(arguments)},i[r].l=1*new Date();a=s.createElement(o),
 m=s.getElementsByTagName(o)[0];a.async=1;a.src=g;m.parentNode.insertBefore(a,m)
 })(window,document,'script','//www.google-analytics.com/analytics.js','ga');

 ga('create', 'UA-XXXXXXXX-X', 'example.com');
 ga('send', 'pageview');
</script>
You will need to copy your entire tracking code from Universal Analytics. It will contain your actual tracking ID instead of UA-XXXXXXXX-X.
Website settings
Now you need to add the tracking code to the pages of your website, for it copy the tracking code to all the pages of your website before the closing tag </head>.
For the Universal Analytics to get information about made orders, you need to modify the tracking code on the page of user notification about made orders, by adding order information to it.
You need to modify the code only on the pages, which user sees after making/approving order; this way, the modified code must be executed only once for each order.
In comparison with modified, usual tracking code must be executed by each view of any page.
For Universal Analytics you need to modify the tracking code the following way:
<script type="text/javascript">
 ...
 ga('send', 'pageview'); // here ends non-modified tracking code. Add following commands:

 ga('require', 'ecommerce', 'ecommerce.js');  // function that adds ecommerce module.
 ga('ecommerce:addTransaction', {
  'id': '1234',                   // transaction ID
  'affiliation': 'example.com',   // Shop name
  'revenue': '1500',              // Total order cost
  'shipping': '250',              // Delivery cost
  'tax': ''                          // Tax
 });

 // method addItem needs to be called for each item (position) in order:
 ga('ecommerce:addItem', {
  'id': '1234',                    // transaction ID
  'name': 'Mouse Logitech',        // Item name
  'sku': 'AAA000',                 // Article or SKU
  'category': 'Wireless',          // Size, model, category or some other information
  'price': '750',                  // Item cost
  'quantity': '2'                  // Item quantity
 });

 ga('ecommerce:send');             // Data sending
</script>
In this code it is possible to specify fields in any order. Necessary fields are only those, containing transaction ID and item name. Field names must be specified by small english characters, for example, category, and not Category, and not CATEGORY.
The code contains the following functions:
ga('require', 'ecommerce', 'ecommerce.js'); — function that connects ecommerce module.
ga('ecommerce:addTransaction', — function that transfers information about the order itself.
The fields, that need to be transferred to the function:
ga('ecommerce:addItem', — function that add information on order items.
The fields, that need to be transferred to the function:
ga('ecommerce:send'); — function cofirming data sending.
You can get familiar with the list of posible fields in official documentation (eng.)
Note Data upload from the shop to system is made on the server part of the shop website. Upload settings is made by the shop developer or webmaster through REST API.
Uploaded orders may contain:
Data upload from the shop to Universal Analytics is made on the customer side, i.e. directly from the shop visitor’s PC.
These data consist of two parts:
The code which is uploading transactions, must be executed only by approval of order by user.
Transactions contain unique (inside the shop) identification number (transaction ID). It must correspond to either external or internal ID, or order number in data uploaded to the system. It is needed for Universal Analytics transaction data connection with data inside the system.
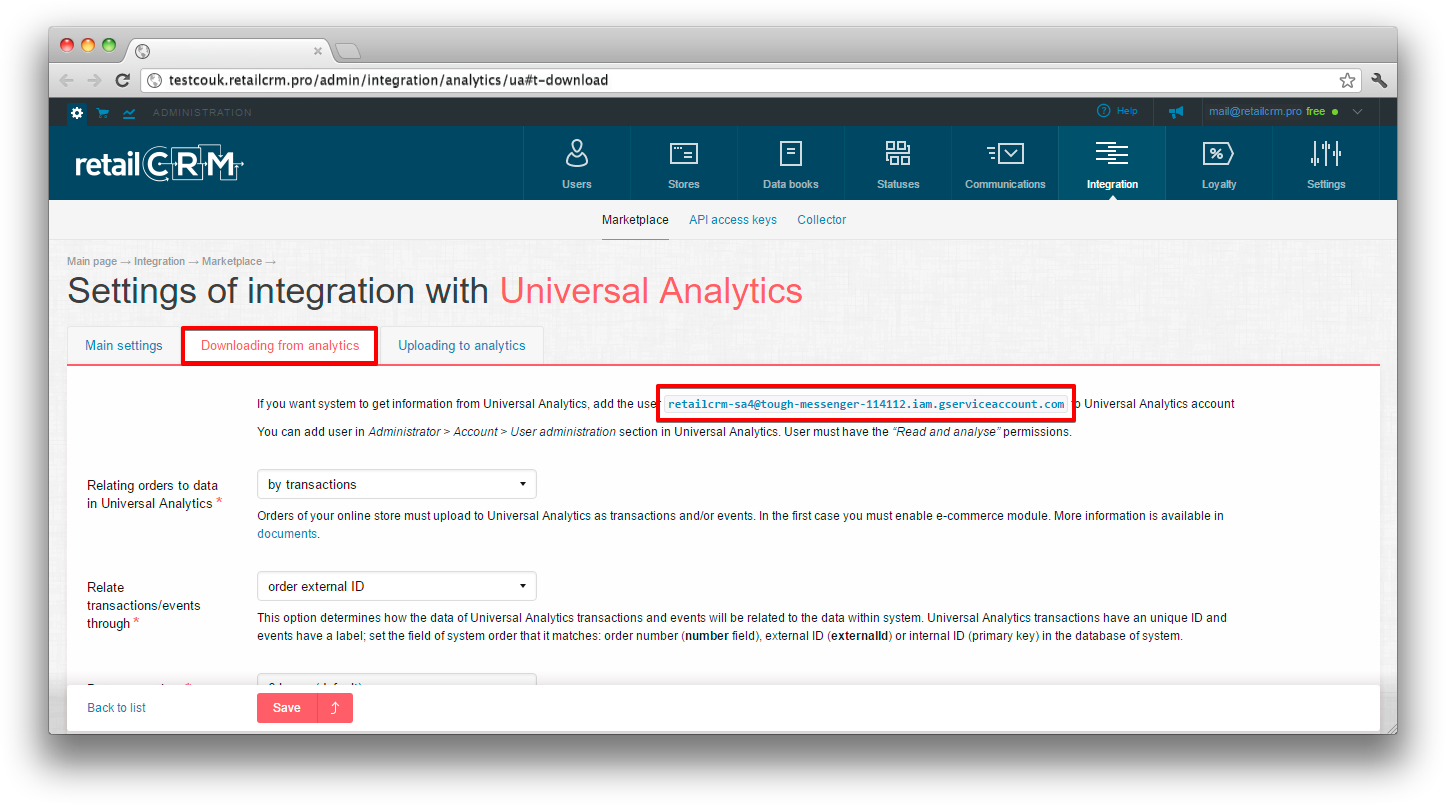
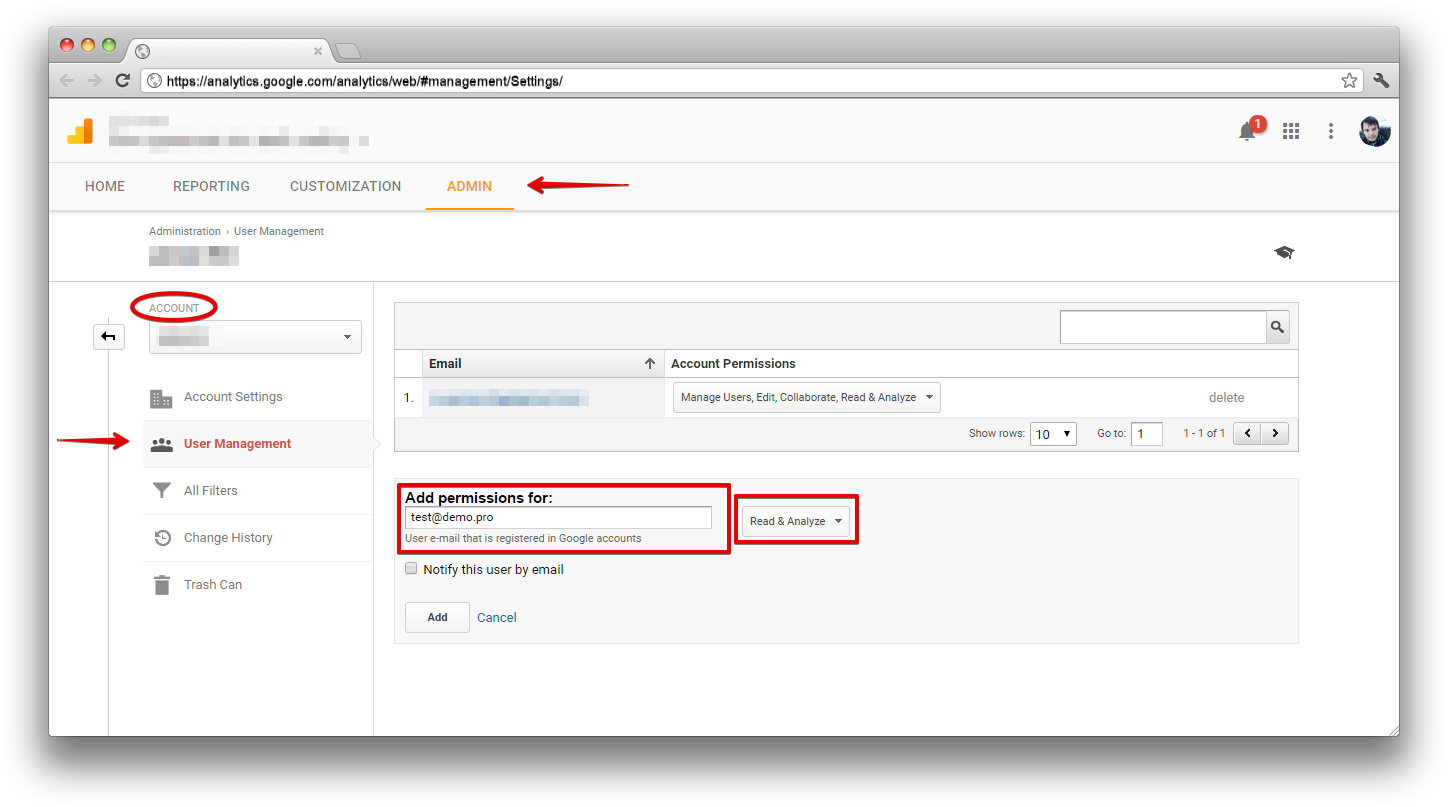
To make integration of the system and your Universal Analytics account successful you need to do the following:
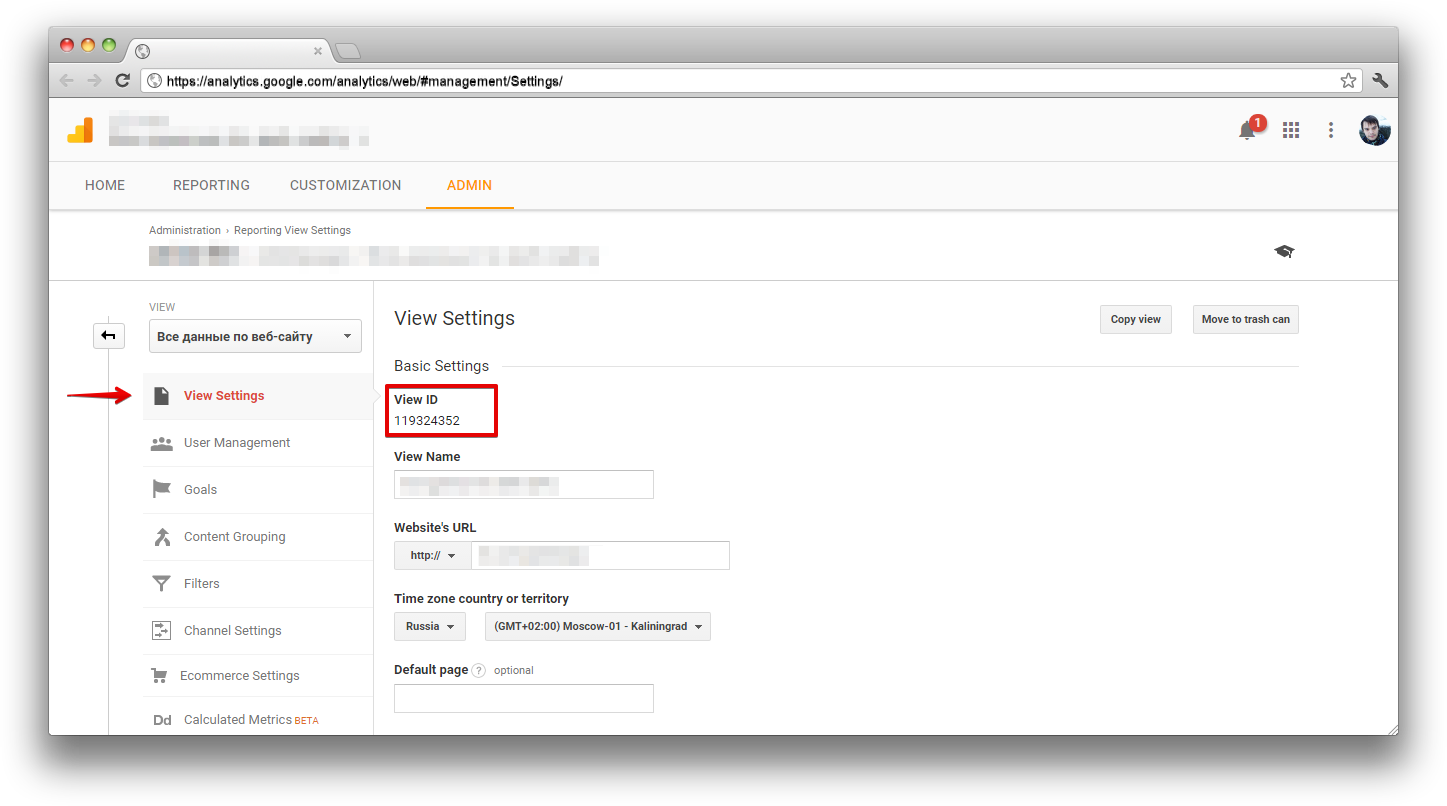
In Universal Analytics it is user paramter (custom dimension). You need to go to section Admin > Property > Custom Definitions > Custom Dimensions and add Parameter retailCRMVisitorID. It will correspond to index number, which needs to be remembered.
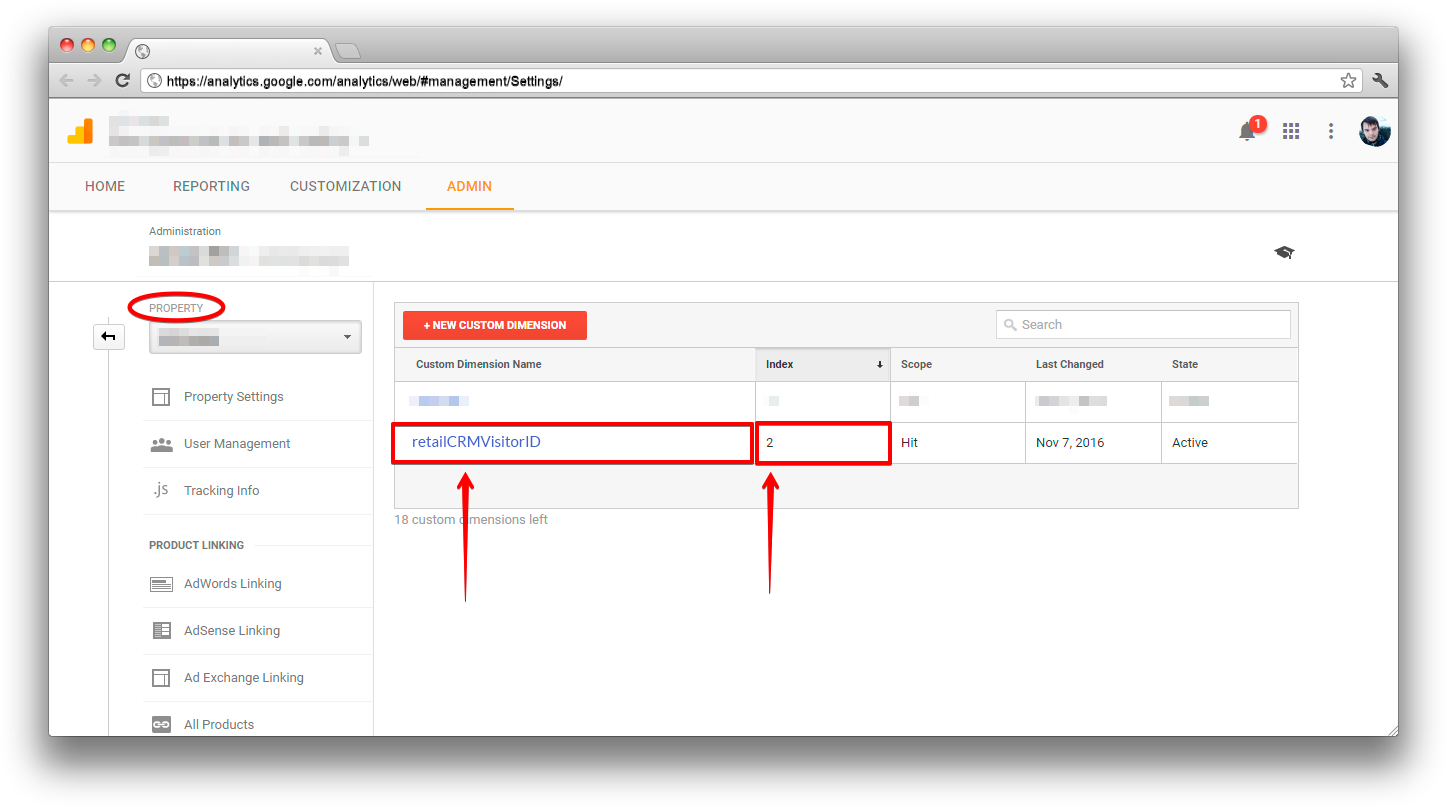
Except Universal Analytics profile/view ID, on the Integration page you need to insert index number, which appeared when adding custom parameter.
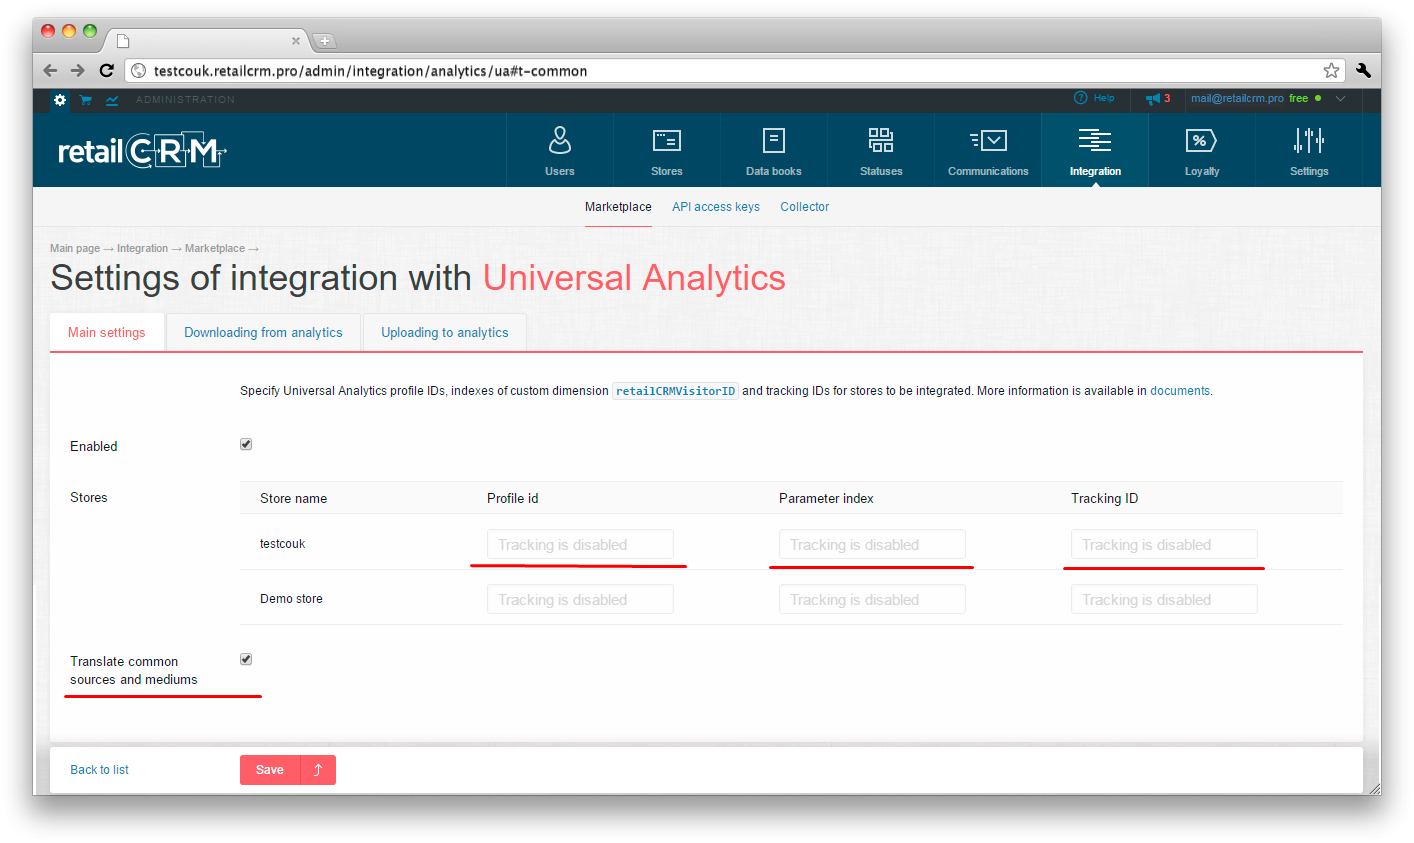
Checkmark «Translate common sources and mediums» allows to display sources and mediums in the standard spelling, i.e. «Google» instead of gmail.com.
/**
 * Get cookie value by name. The system integration with Universal Analytics uses it.
 * Name should match pattern [a-zA-Z0-9_]+
 *
 * @param string name
 *
 * @return mixed
**/
function getRetailCrmCookie(name) {
    var matches = document.cookie.match(new RegExp(
        '(?:^|; )' + name + '=([^;]*)'
    ));

    return matches ? decodeURIComponent(matches[1]) : '';
}

ga('set', 'dimension1', getRetailCrmCookie('_ga'));
You need to insert it before ga('send', 'pageview'); in the tracking code to all pages of your website.
Important! In the last line of the added code, ga('set', 'dimension1', getRetailCrmCookie('_ga'));, the one in the end of dimension1 needs to be changed to user parameter index, in case if it not equals 1.
Universal Analytics identificates website users with the help of temporary files - cookies, that are stored on the user PC. One of them contains unique user mark. The script, that is added to tracking code, reads the unique mark and then sends this value to Universal Analytics, where it is stored in user variable (in Client ID user parameter in Universal Analytics).
Cookie _ga contains a unique ID in GA1.2.XXXXXXX.YYYYYY format, for example, GA1.2.1129978185.1425645525, where the mark itself is the value 1129978185.1425645525 (clientId). The system can get as full cookie value (that will happen if you use the code mentioned above), as well as only clientId without prefix.

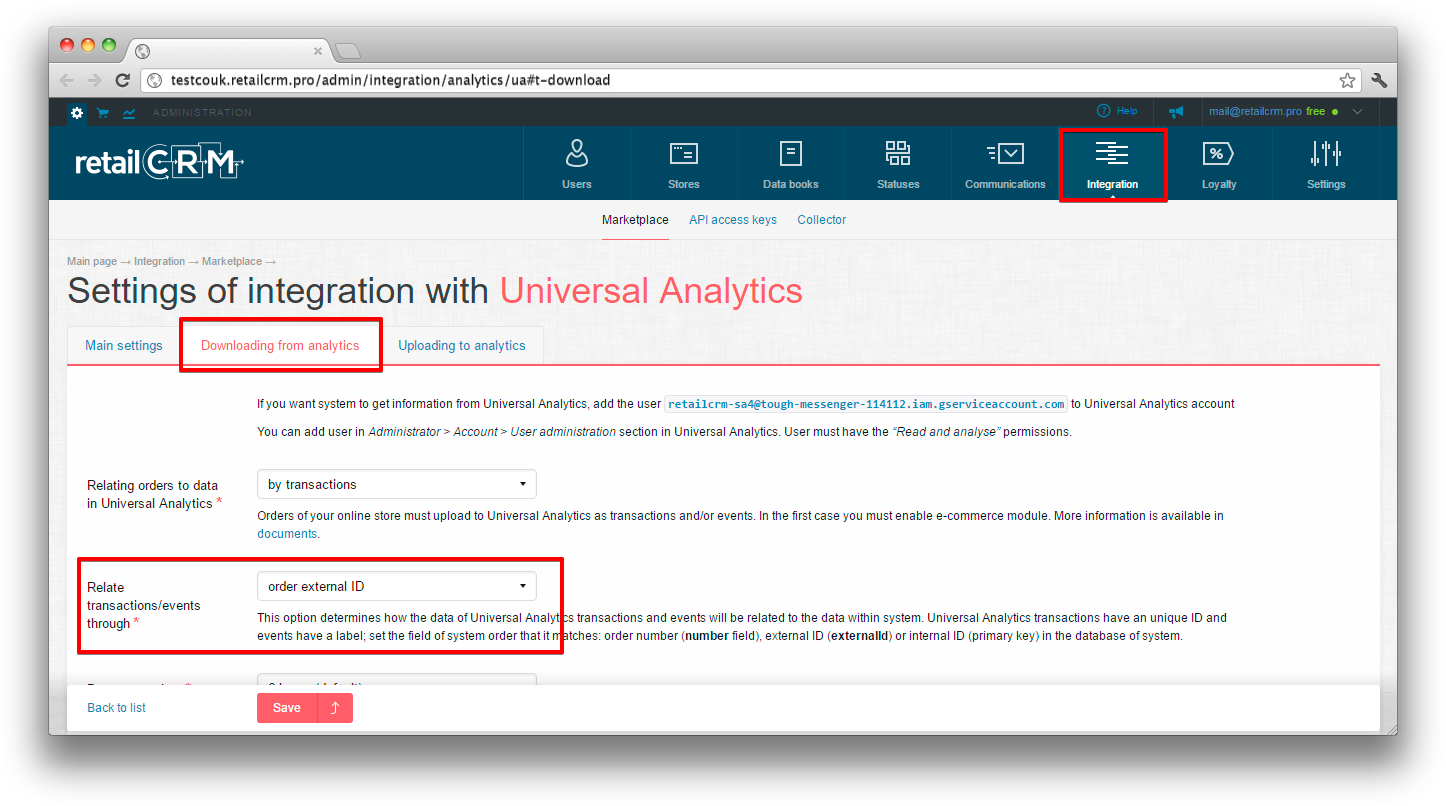
For example, visitor can request for a call or fill the feedback form besides the purchase at site. This creates an order in retailCRM. But you don't want to create transaction in Universal Analytics ecommerce module because this event is not a purchase. In such case it is possible to set event and get data of web analytics for this customer through this event (sources, mediums, campaigns, visits, etc.).
In case, if you choose the order relating variant by events, there will appear two fields for event loading: “Category” and “Action”.

In these fields it is necessary to specify categories and actions for events, which shortcut contains identifiers appropriate to the system orders. You can specify only category or shortcut, in this case the filtration by downloaded events will not be made by another field.
Pay attention, that it is necessary to fill category or action, but shortcut must be empty, because order ID will be transferred in it for relation. At the site side you should register the events sending to Universal Analytics on necessary action (click, form sending, etc.). It is mandatory to specify order ID as a shortcut.
How to create, edit and share the goals you can learn in Google help.
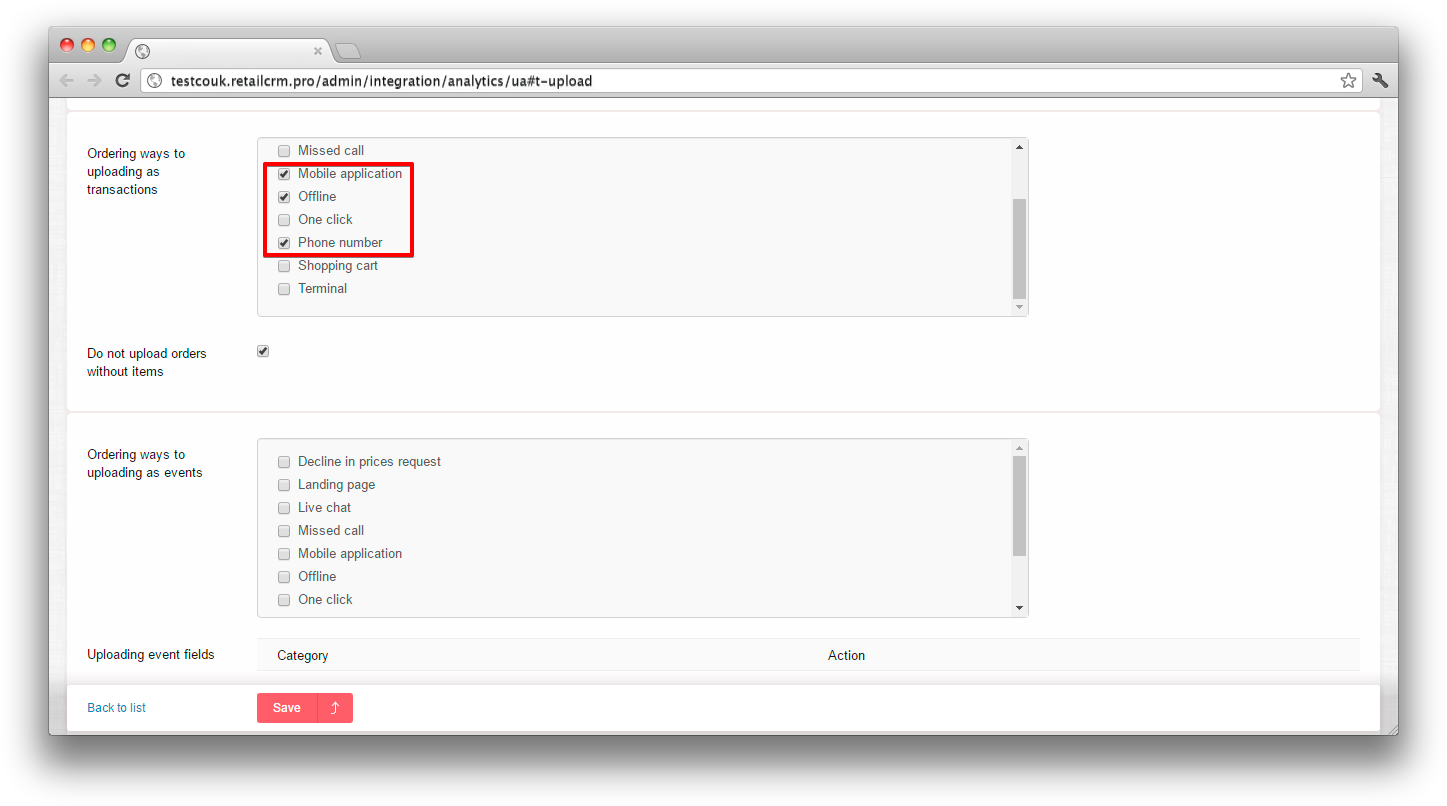
It is also possible to transfer information on offline orders from the system to Universal Analytics. To do it you need to set checkboxes near those order registration methods in block “Registration methods for upload”, information on which needs to be sent to GA. With the help of checkbox “Do not upload orders without items” it is also possible to set whether orders containing no items will be uploaded or not.
On orders, where customers’ Client ID is received, the data is transferred to your Universal Analytics account once every 2 hours, offline transactions are downloaded only on those customers, whose Client IDs are known to the system, i.e. customer must make at least one order or request through the website before that.
This setting is useful in those cases, when orders come not only through the website, but also to detect the real effectiveness of ad sources. This capability is especially useful when integrating the system with dynamic calltracking systems, for example CallTouch.
Client marks (Client ID) - is a servise information, that requires no special submission. They are generated automatically on the user PC and are saved in Universal Analytics together with all the information.
In this case can be the following scenarios of use:
In second case it doesn’t matter where the Client ID was received from - from GA or from the first case, though in last case data from CallTouch will be also aquired.
If Client ID comes to customer not from Universal Analytics, but for example from CallTouch, then the system will try to aquire data on this customer with next data load.
For example, customer was wandering on the shop’s website and his visits were fixed in Universal Analytics, he made an order over the phone and data was sent to the system through CallTouch, then his visits should be also collected by the system.
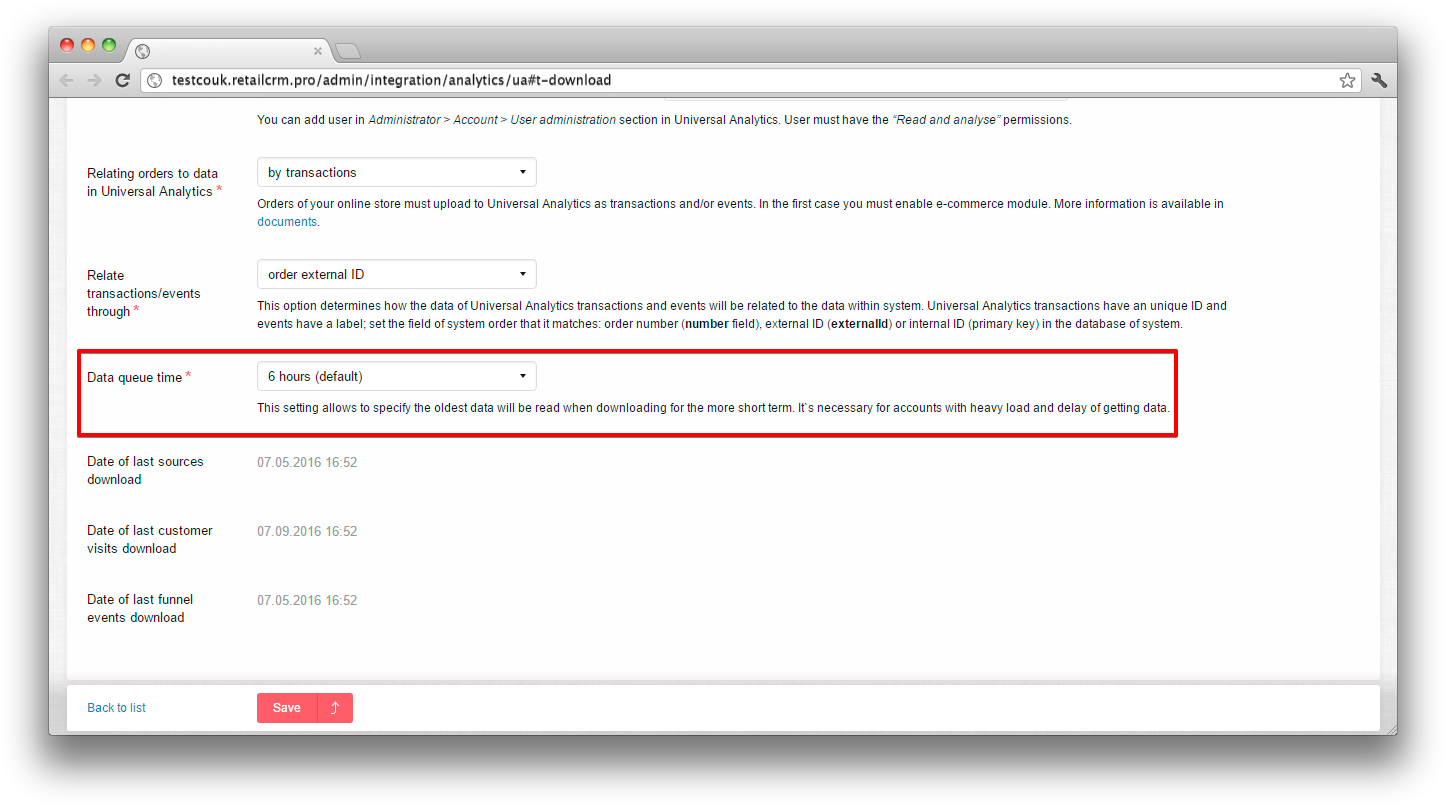
This setting allows to specify the recentness of records that will be read by loading for the shorter period. This is needed for higly loaded Universal Analytics accounts which get data belatedly.
To turn on this option you need to go to section Administration > Integration > Universal Analytics. In the field “Data queue time” you set the read time you need.
InSales is probably the most convenient CMS for integration from the point of customer website configuration. To do it you need to go to Settings. The tracking code is added to the field javascript-code for displaying on all the shop website pages. Example: (in all examples UA-XXXXXXXX-X needs to be changed to real property ID!):
<script>
  (function(i,s,o,g,r,a,m){i['GoogleAnalyticsObject']=r;i[r]=i[r]||function(){
  (i[r].q=i[r].q||[]).push(arguments)},i[r].l=1*new Date();a=s.createElement(o),
  m=s.getElementsByTagName(o)[0];a.async=1;a.src=g;m.parentNode.insertBefore(a,m)
  })(window,document,'script','//www.google-analytics.com/analytics.js','ga');

  ga('create', 'UA-XXXXXXXX-X', 'auto');

  function getCookie(name) {
    var matches = document.cookie.match(new RegExp(
        "(?:^|; )" + name.replace(/([\.$?*|{}\(\)\[\]\\\/\+^])/g, '\\$1') + "=([^;]*)"
    ));

    return matches ? decodeURIComponent(matches[1]) : "";
 }

  ga('set', 'dimension1', getCookie("_ga"));
  ga('send', 'pageview');
</script>
As InSales places this code not in the beginning of the page, it needs to be duplicated. That’s why transaction download code needs to be placed to the javascript-code field for displaying it on the successful order registration page, adding the code mentioned above to its beginning (and, in fact, duplicating it in within the page). Example:
<script>
  (function(i,s,o,g,r,a,m){i['GoogleAnalyticsObject']=r;i[r]=i[r]||function(){
  (i[r].q=i[r].q||[]).push(arguments)},i[r].l=1*new Date();a=s.createElement(o),
  m=s.getElementsByTagName(o)[0];a.async=1;a.src=g;m.parentNode.insertBefore(a,m)
  })(window,document,'script','//www.google-analytics.com/analytics.js','ga');

  ga('create', 'UA-XXXXXXXX-X', 'auto');

  function getCookie(name) {
    var matches = document.cookie.match(new RegExp(
        "(?:^|; )" + name.replace(/([\.$?*|{}\(\)\[\]\\\/\+^])/g, '\\$1') + "=([^;]*)"
    ));

    return matches ? decodeURIComponent(matches[1]) : "";
 }

  ga('set', 'dimension1', getCookie("_ga"));
  ga('send', 'pageview');

  // UA transaction upload code starts here
  ga('require', 'ecommerce', 'ecommerce.js');
  ga('ecommerce:addTransaction', {
    'id': {{order.number}},
    'affiliation': 'site.ru', // change for real domain name
    'revenue': {{order.total_price}}
  });
  {% for item in order.items %}
    ga('ecommerce:addItem', {
      'id': {{order.number}},
      'price': {{item.sale_price}},
      'quantity': {{item.quantity}}
     });
  {% endfor %}
  ga('ecommerce:send');
</script>
Attention! When integrating with InSales you need to specify “Bind transactions through Order number", that differs from the default setting. InSales settings have also field Google Analytics code for website visitors analysis. It needs no filling: firstly, a GA- but not UA-code will be generated; secondly, the code will be generated “out of box” and will not allow you to add the record of the unique mark from cookies in custom dimension.